You can start growing hydroponic vegetables today for less than the cost of dinner at a nice restaurant. While commercial hydroponic systems cost hundreds or even thousands of dollars, effective DIY systems can be built from inexpensive materials found at any hardware store or dollar shop.
This guide shows you exactly how to build three proven hydroponic systems, each costing under 50 dollars. You will get complete materials lists, step-by-step build instructions, and tips for getting the best results from each system. No special skills required—if you can drill a hole and follow instructions, you can build these systems.
These are not toy projects or demonstrations. These are the same systems that serious hydroponic gardeners use to grow real food. Commercial systems add convenience and polish, but DIY systems grow plants just as well at a fraction of the cost.
New to hydroponics? Read our complete beginner guide first to understand the basics before building.
Why Build Your Own Hydroponic System?
Building your own system offers advantages beyond just saving money, though the savings are substantial.
Dramatic cost savings: A commercial DWC system costs 75-150 dollars. You can build an equivalent system for 25-35 dollars using the same principles. That savings lets you build multiple systems, buy better nutrients, or simply keep money in your pocket.
Complete customization: Commercial systems come in fixed sizes and configurations. DIY systems can be sized exactly to your space, modified for specific plants, and adjusted based on your experience. Your system fits your needs instead of forcing your needs to fit the system.
Deeper understanding: Building a system teaches you how hydroponics actually works. When problems arise—and they will—you understand the system well enough to diagnose and fix issues. Growers who build their own systems become better troubleshooters than those who buy turnkey solutions.
Easy repairs and upgrades: When something breaks in a DIY system, you know exactly what to replace and where to find parts. Commercial systems sometimes use proprietary components that are expensive or difficult to source. DIY components come from any hardware store.
Satisfaction of self-reliance: There is genuine satisfaction in eating vegetables from a system you built with your own hands. That connection to your food deepens the enjoyment of both gardening and eating.
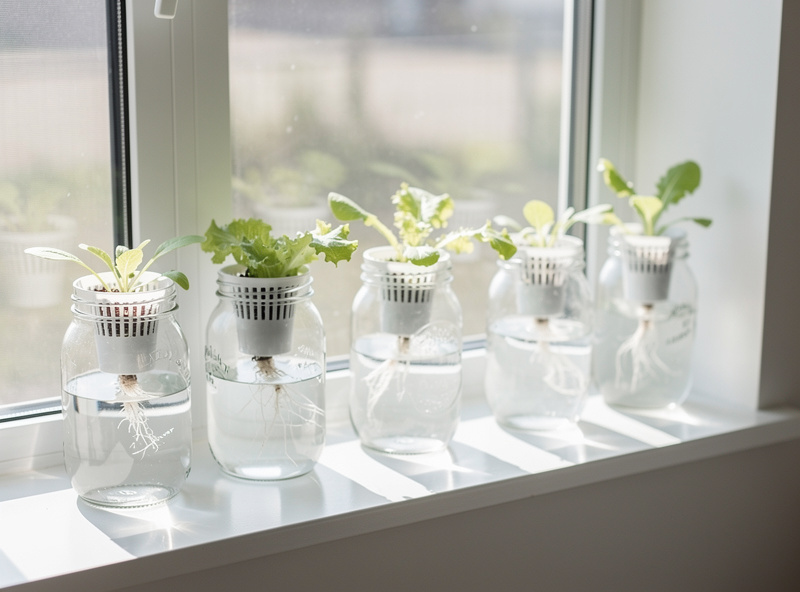
System 1: The Kratky Mason Jar (Under 10 Dollars)
The Kratky method is the simplest possible hydroponic system—so simple it seems like it should not work. But it does work, remarkably well, and it costs almost nothing to build. This is the perfect first project for absolute beginners.
What Is the Kratky Method?
Developed by Dr. Bernard Kratky at the University of Hawaii’s College of Tropical Agriculture and Human Resources (CTAHR), this passive hydroponic method requires no pumps, no electricity, and no moving parts whatsoever. Plants sit in net pots above a reservoir of nutrient solution. As plants drink the solution, the water level drops, exposing more roots to air. The plants automatically get the water, nutrients, and oxygen they need without any intervention from you.
It is also the method I hand beginners on my own bench first. A Kratky jar on the windowsill costs almost nothing to fail at, and failing at it teaches you more about root oxygen than a textbook chapter would.
The key insight is that roots above the water line absorb oxygen from the air gap while roots below the water line absorb water and nutrients. As long as some roots stay wet and some stay dry, plants thrive. It sounds almost too simple, but decades of research and countless successful grows prove it works.
Materials Needed
- Quart-size mason jar: 2-3 dollars (or free if you have one)
- 3-inch net pot: 0.50 dollars
- Clay pebbles or perlite, small amount: 2-3 dollars
- Hydroponic nutrients: 3-5 dollars for a sample size
- pH test kit or strips: 3-5 dollars
- pH Down solution: 3-4 dollars
- Black spray paint, tape, or fabric: 1-3 dollars
As an Amazon Associate I earn from qualifying purchases.
Total cost: approximately 15-23 dollars (much less if you already have some materials)
You can build multiple Kratky jars from the same supplies since nutrients and pH supplies last for many grows.
Step-by-Step Build Instructions
Step 1: Block light from the jar. Clear glass lets light into the nutrient solution, which causes algae growth. Paint the outside of the jar with black spray paint, wrap it in black tape, or cover it with dark fabric. Leave the inside clean and clear. Light blocking is essential—do not skip this step.
Step 2: Prepare the lid. Mason jar lids have two parts: the flat disc and the ring. Trace your net pot onto the flat disc and cut a hole slightly smaller than the pot rim. The net pot should sit in the hole with its rim resting on the lid, suspending the pot above the jar interior. A drill with a step bit makes this easy, but you can also use tin snips or a rotary tool. If you own a 3D printer, this is also the easiest lid in the whole guide to print instead of cut — I run a printed collar on most of my own Kratky jars because it seats the net pot cleaner than a hand-cut hole ever does.
Step 3: Mix nutrient solution. Fill the jar with water, leaving about one inch of headspace. Add hydroponic nutrients according to package directions—usually about one teaspoon per gallon for seedlings, more for mature plants. Stir thoroughly to dissolve completely.
Step 4: Adjust pH. Test your nutrient solution with pH strips or a meter. Target range is 5.5-6.5. Most tap water with nutrients added will be above this range. Add pH Down solution a few drops at a time, stirring and retesting until you reach the target zone.
Step 5: Add plant and medium. Place your seedling in the net pot, gently spreading roots downward. Fill around the plant with clay pebbles or perlite to hold it upright. The growing medium should be damp from nutrient solution wicking up.
Step 6: Position correctly. The bottom of the net pot should just touch the nutrient solution, or come within half an inch of it. Roots will quickly grow down into the water. As the plant drinks and the water level drops, an air gap forms automatically.
Step 7: Place in light and wait. Set your Kratky jar where it will receive adequate light—a sunny windowsill or under a grow light. Then leave it alone. Do not top off the water. Do not add more nutrients. The system is designed to work without intervention until harvest.
Best Plants for Kratky Mason Jars
The small reservoir limits plant size and growing duration. Stick to compact, fast-growing plants:
- Lettuce (all varieties)
- Herbs: basil, cilantro, mint, parsley
- Small leafy greens: arugula, spinach, kale (harvest young)
- Green onions
Avoid large plants, fruiting plants, or anything that takes more than 6-8 weeks to mature. The limited nutrient supply cannot sustain long-term growth.
Tips for Kratky Success
Start with seedlings, not seeds. Germinating seeds in a Kratky jar is tricky because moisture levels are hard to control. Start seeds in rockwool cubes or paper towels, then transplant seedlings once they have roots.
Choose the right jar size. Larger plants need larger reservoirs. A quart jar works for lettuce and small herbs. Larger plants like full-size basil do better in half-gallon or gallon jars.
Do not refill the reservoir. The Kratky method depends on roots adapting to the dropping water level. Refilling can drown roots that have adapted to air exposure. Start with a full reservoir and let the plant use it until harvest.
Watch for tip burn. Brown leaf edges indicate nutrient concentration has become too strong as water evaporates. Next time, start with a slightly weaker nutrient solution.
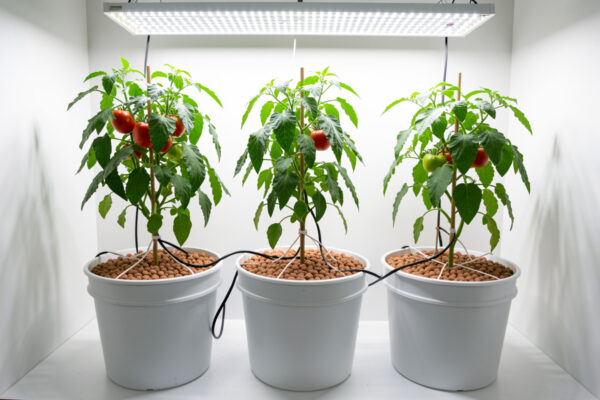
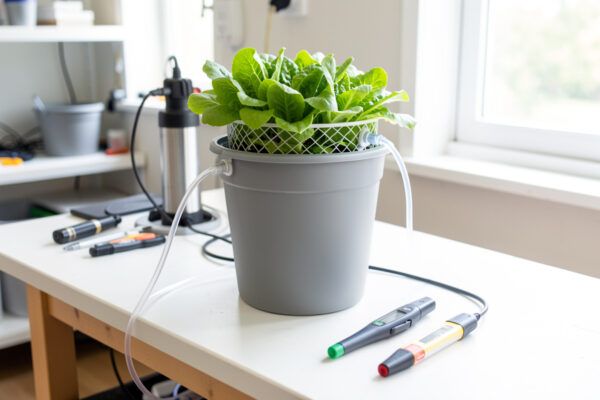
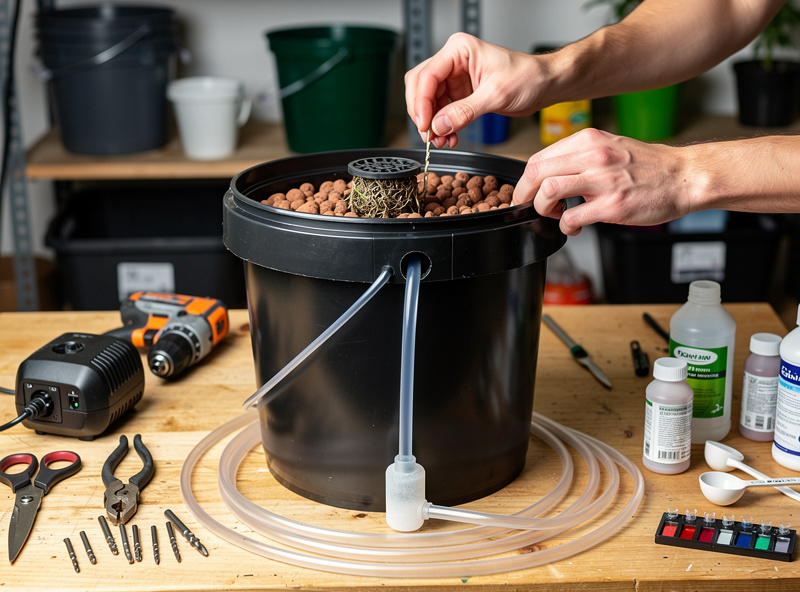
System 2: The 5-Gallon Bucket DWC (Under 35 Dollars)
Deep Water Culture in a 5-gallon bucket is the workhorse of DIY hydroponics. This simple system grows larger plants than Kratky jars and can be scaled by adding more buckets. Most hydroponic beginners should build this system first.
Why DWC Works So Well
In DWC, plant roots hang directly in oxygenated nutrient solution 24 hours a day. An air pump bubbles oxygen into the water continuously, preventing the root suffocation that would otherwise occur. Roots have unlimited access to water, nutrients, and oxygen simultaneously, which drives remarkably fast growth.
This bucket is basically the low-cost version of the DWC totes I run side by side on my own bench. Same principle, same target EC, just a cheaper reservoir — I still log pH and EC on mine the same way.
DWC systems are simple to build, easy to understand, and forgiving enough for beginners while capable enough for expert growers. Commercial hydroponic operations use DWC principles because they work reliably at any scale.
Materials Needed
- 5-gallon bucket with lid: 4-6 dollars at any hardware store
- 6-inch net pot: 1-2 dollars
- Air pump (aquarium type, 4+ watts): 8-12 dollars
- Air stone (medium size): 2-3 dollars
- Air tubing (several feet): 2-3 dollars
- Clay pebbles (enough to fill net pot): 6-8 dollars
- Hydroponic nutrients: 8-15 dollars for a starter set
- pH test kit and adjustment: 8-12 dollars
Total cost: approximately 39-61 dollars for the first system, but nutrients and pH supplies last for many grows. Subsequent buckets cost only 15-25 dollars each since you reuse consumables.
Step-by-Step Build Instructions
Step 1: Cut the lid hole. Trace your 6-inch net pot onto the center of the bucket lid. Cut a hole slightly smaller than the pot rim so the pot sits securely without falling through. A jigsaw or rotary tool works well, but you can use a utility knife with patience. Sand any rough edges.
Step 2: Add an air line port. Drill a small hole near the edge of the lid, just large enough for your air tubing to pass through. This lets you run the air line into the bucket while keeping the lid closed.
Step 3: Optional but recommended—add a water level indicator. Drill a hole in the side of the bucket near the bottom and install a short piece of clear tubing as a sight glass. This lets you check water level without opening the lid. Seal with aquarium silicone if it leaks.
Step 4: Set up the air system. Connect air tubing from your air pump to the air stone. Drop the air stone into the bottom of the bucket. Run the tubing up and out through the lid hole. The air pump stays outside the bucket, plugged into an electrical outlet.
Step 5: Mix nutrient solution. Fill the bucket with water to about 2 inches below where the net pot bottom will sit. Add hydroponic nutrients according to package directions for vegetative growth—typically 1-2 teaspoons per gallon of each component. Stir or run the air pump to mix thoroughly.
Step 6: Adjust pH. Test and adjust pH to the 5.5-6.5 range using pH Down or pH Up as needed. This step is critical—do not skip it. Check pH every few days during the first weeks until you learn how your system behaves.
Step 7: Plant and close. Place your seedling in the net pot with roots dangling below. Fill around the stem with clay pebbles to support the plant. The pebbles should touch the nutrient solution or come very close—the wicking action keeps the root zone moist until roots grow down into the water.
Step 8: Turn on the air pump. Bubbles should rise continuously from the air stone. The surface should ripple with agitation. More bubbles are better—you cannot over-oxygenate the water. Leave the pump running 24/7.
Best Plants for Bucket DWC
The 5-gallon bucket handles larger plants than Kratky jars:
- Large lettuce plants (full heads)
- Big basil plants that produce for months
- Tomatoes (especially cherry and determinate varieties)
- Peppers (all types)
- Cucumbers (bush varieties)
- Strawberries
- Most herbs
For very large plants like full-size tomatoes, consider using multiple buckets connected together or upgrading to larger containers.
Ongoing Maintenance
Check water level weekly. Plants drink more as they grow. Top off with plain pH-adjusted water when the level drops. About every 1-2 weeks, add a small amount of nutrients to replace what plants have consumed.
Monitor pH regularly. pH tends to drift over time as plants consume nutrients. Check every few days and adjust as needed to maintain the 5.5-6.5 range.
Full reservoir change monthly. Every 2-4 weeks, dump the old solution and mix fresh. This prevents nutrient imbalances and salt buildup that accumulate over time.
Watch water temperature. Nutrient solution works best between 65-72 degrees Fahrenheit. Warm water holds less oxygen and encourages root disease. In hot weather, use frozen water bottles to cool the reservoir or move the system to a cooler location.
Common DWC Problems and Solutions
Brown, slimy roots (root rot): Usually caused by warm water, insufficient oxygen, or light leaking into the reservoir. Increase aeration, reduce temperature, and ensure the bucket blocks all light. A one-time dose of 3% hydrogen peroxide at 2-3 mL per liter of reservoir volume (roughly 8-11 mL per gallon) can help treat early infections — it is the same reset I reach for on my own res when I catch a root going brown early, and I keep the res below 68°F afterward to keep it from coming back.
Slow growth: Check pH first—this is the most common cause. Also verify nutrients are at proper strength and roots are receiving adequate oxygen.
Leaf tip burn: Nutrient concentration is too high. Dilute with plain water or change the reservoir with weaker solution.
Algae in reservoir: Light is entering the system. Improve light blocking on the bucket and lid. Algae competes with roots for oxygen.
System 3: The Storage Bin Floating Raft (Under 50 Dollars)
When you want to grow many plants at once, the floating raft system delivers. This larger system grows 6-12 or more plants in a single container, making it ideal for lettuce and herb production. Commercial lettuce operations use this exact method at massive scale.
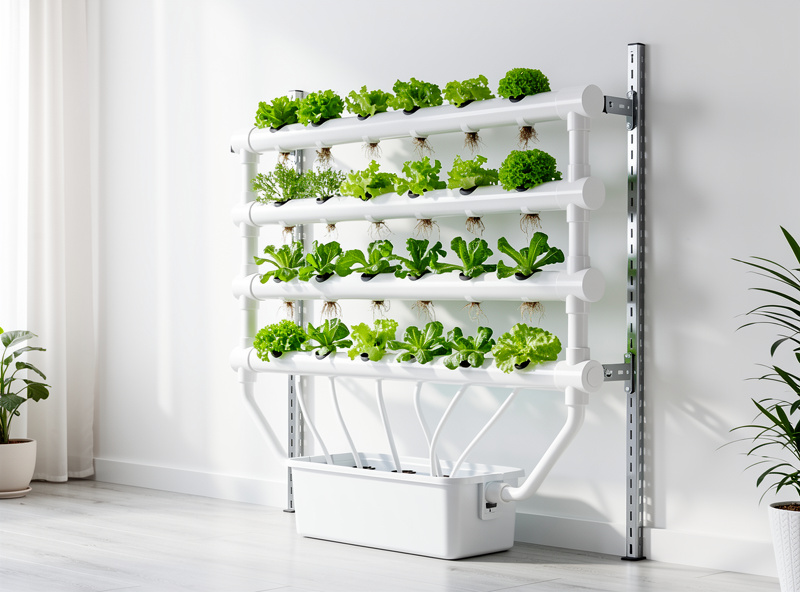
How Floating Raft Works
Plants sit in net pots suspended through holes in a floating foam board. The foam floats on the nutrient solution, automatically keeping roots at the perfect depth. As plants drink and the water level drops, the raft drops with it, maintaining consistent root immersion. An air pump oxygenates the solution just like in bucket DWC. Commercial-scale floating raft lettuce production runs on the same core mechanics your storage bin does, just with a chiller and far more square footage — see the University of Kentucky’s hydroponic lettuce production guide for how growers scale it commercially.
This system combines the simplicity of Kratky with the active aeration of DWC. The floating raft eliminates the need for precise water levels—the system self-adjusts automatically.
Materials Needed
- Large storage bin, 20-30 gallons: 10-15 dollars
- Foam insulation board, 1-2 inch thick: 5-8 dollars
- Net pots, 2-inch, quantity 8-12: 4-6 dollars
- Air pump, medium size (10+ watts): 12-18 dollars
- Air stones, 2 or more: 4-6 dollars
- Air tubing and splitter: 3-5 dollars
- Clay pebbles: 8-10 dollars
- Hydroponic nutrients: 8-15 dollars
- pH test kit and adjustment: 8-12 dollars
Total cost: approximately 62-95 dollars, with most items reusable for many grows. Subsequent rafts cost only 5-10 dollars for foam and net pots.
Step-by-Step Build Instructions
Step 1: Prepare the bin. Clean the storage bin thoroughly. If it is translucent, wrap the outside with black plastic or paint to block light. The lid can be discarded—the floating raft replaces it.
Step 2: Cut the floating raft. Measure the inside dimensions of your bin. Cut foam insulation board to fit inside with about half an inch gap on all sides. This gap allows the raft to move freely as water level changes. Use a sharp utility knife for clean cuts.
Step 3: Mark net pot positions. Plan your plant spacing—2-inch net pots holding lettuce need about 6-8 inches between centers. Mark positions evenly across the foam surface. Avoid placing holes too close to edges where the foam might break.
Step 4: Cut net pot holes. Using a hole saw, sharp knife, or even a heated can of the right diameter, cut holes sized to hold your net pots securely. The pot rim should rest on the foam while the pot body hangs below. Test fit each hole and enlarge if needed.
Step 5: Install air system. Place two or more air stones in the bottom of the bin, spaced evenly. Connect them with air tubing to a splitter, then to your air pump. Position the pump above water level to prevent backflow if power fails.
Step 6: Fill and mix nutrients. Add water to the bin, leaving about 4-6 inches from the top. Add hydroponic nutrients according to package directions. Stir to dissolve completely.
Step 7: Adjust pH. Test and adjust pH to 5.5-6.5 range. With a larger water volume, pH tends to be more stable than in small containers. Check weekly rather than daily once you know your system.
Step 8: Float the raft and plant. Turn on the air pump, then place the foam raft on the water surface. It should float with about half its thickness above water. Insert net pots with seedlings and clay pebbles. Roots should dangle into or just above the nutrient solution.
Best Plants for Floating Raft
The floating raft system excels at high-volume production of compact plants:
- Lettuce (the classic raft crop)—grow 8-12 heads at once
- Leafy greens: spinach, arugula, chard, kale
- Herbs: basil, cilantro, parsley, chives
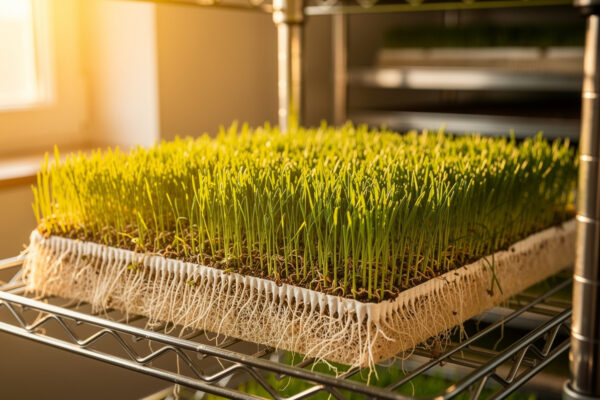
- Microgreens in high density
- Strawberry plants
Avoid tall or heavy plants that could tip the raft or require support structures. Save tomatoes and peppers for individual bucket systems.
Scaling Up
The floating raft system scales beautifully. Use longer storage bins for more plants. Add multiple bins for even larger production. Commercial operations run hundreds of feet of raft channels growing thousands of lettuce heads. Your backyard version uses identical principles at smaller scale.
Consider a continuous harvest rotation: plant a few net pot positions each week, and harvest the oldest plants each week. This provides steady production rather than one large harvest followed by waiting.
Comparison: Which Budget System Should You Build?
Each DIY system fits different needs and situations:
| Factor | Kratky Jar | Bucket DWC | Floating Raft |
|---|---|---|---|
| Cost | Under 10 dollars | Under 35 dollars | Under 50 dollars |
| Difficulty | Very Easy | Easy | Easy-Medium |
| Electricity | None needed | Required | Required |
| Plant Capacity | 1 small plant | 1 large plant | 8-12 plants |
| Best Plants | Herbs, lettuce | Tomatoes, peppers | Lettuce, greens |
| Maintenance | Almost none | Weekly checks | Weekly checks |
| Scalability | Make more jars | Add more buckets | Use larger bins |
Start with Kratky if you want the simplest possible introduction to hydroponics with zero ongoing maintenance. Perfect for testing if hydroponics interests you before investing more.
Start with Bucket DWC if you want to grow larger plants like tomatoes and peppers, or if you want a versatile system that teaches fundamental hydroponic principles. This is the best all-around choice for most beginners.
Start with Floating Raft if you want to grow many lettuce plants or herbs at once for regular harvests. Ideal if you eat a lot of salads and want ongoing production.
Where to Buy Materials
All DIY system materials are widely available at common stores:
| Store Type | Best For | Price Range | Pros | Cons |
|---|---|---|---|---|
| Hardware Stores | Buckets, bins, PVC, foam board | $ | Immediate pickup, lowest prices on containers | Limited hydroponic-specific items |
| Pet/Aquarium Stores | Air pumps, air stones, tubing | $$ | Quality equipment designed for water use | Smaller selection than online |
| Dollar Stores | Jars, small containers, basics | $ | Cheapest possible option | Quality varies, limited selection |
| Garden Centers | Net pots, clay pebbles, nutrients | $$$ | Expert advice, immediate availability | Highest prices, limited stock |
| Amazon/Online | Net pots, nutrients, pH kits | $$ | Widest selection, competitive prices | Shipping wait time |
Hardware stores (Home Depot, Lowes, Menards): Buckets, storage bins, PVC fittings, foam insulation board, air pumps (aquarium section), basic tools. Best prices on containers and building materials.
Pet stores or aquarium sections: Air pumps, air stones, air tubing. Aquarium equipment works perfectly for hydroponics—it is designed for exactly this purpose.
Dollar stores: Mason jars, small containers, measuring supplies, timers. Surprisingly useful for inexpensive basics.
Garden centers: Net pots, clay pebbles, perlite, sometimes hydroponic nutrients. Specialty items may cost more here than online.
Amazon and online: Best selection and often best prices for hydroponic-specific items like net pots, nutrients, pH test kits, and specialty supplies. Read reviews to find reliable products.
Common DIY Mistakes to Avoid
Learn from others who have made these errors:
Using clear containers: Light promotes algae growth that competes with plants and looks disgusting. Always block light from your nutrient solution with paint, tape, or opaque containers.
Skipping pH adjustment: Many beginners think pH does not matter or is optional. It is not. Incorrect pH locks out nutrients and kills plants even when everything else is perfect. Test and adjust pH—every single time.
Undersizing air pumps: More oxygen is always better for roots. When in doubt, buy a larger air pump than you think you need. A pump that is too strong costs a little extra but grows better plants. A pump that is too weak suffocates roots. I learned this one the hard way on an early bucket — an undersized pump left the water barely rippling, and by the time I noticed, the roots were already going brown.
Starting with seeds in the system: Germinating seeds requires careful moisture control that is hard to achieve in hydroponic systems. Start seeds separately in rockwool cubes, paper towels, or soil, then transplant seedlings once they have roots.
Not having backup equipment: Air pumps fail without warning. A failed air pump kills DWC plants within 24-48 hours. Keep a spare pump on hand—it is cheap insurance for your entire garden.
Overcomplicating the build: Simple systems work. Resist the urge to add unnecessary complexity. Master basic systems before building elaborate automated setups.
Next Steps After Building
Once your DIY system is running, here is what comes next:
- Plant something easy — See our guide to best plants for beginners and start with lettuce or herbs
- Monitor and learn — Check pH regularly, observe plant health, and learn how your system behaves
- Avoid common mistakes — Read our guide to hydroponic mistakes so you know what to watch for
- Expand when ready — Add more containers, try different plants, experiment with system variations
For more detailed information on equipment and supplies, see our complete equipment guide. To understand different system types beyond these DIY builds, read our hydroponic systems overview.
Building your own hydroponic system is just the beginning. The real fun starts when you harvest your first vegetables from a system you built with your own hands. Get building and get growing.
If you also want to grow plants in soil containers alongside your hydroponic setup, CityRooted has a complete guide to indoor container gardening that covers potting soil selection, container sizing, watering schedules, and the full soil-based growing process.
What is the cheapest hydroponic system to build?
The Kratky method is the cheapest hydroponic system at under $10. It requires only a mason jar or bucket, a net pot, clay pebbles, and nutrients — no pumps, no electricity, no moving parts. It works perfectly for lettuce and herbs and is the ideal first project for beginners.
Can I build a DWC system for under $30?
Yes. A 5-gallon bucket ($5), 6-inch net pot ($3), air pump and air stone ($10-15), clay pebbles ($8-10), and nutrients ($5-10) totals $28-43. This system grows everything from lettuce to full-size tomatoes and is the most versatile budget hydroponic setup.
What materials do I need for a DIY NFT channel?
A DIY NFT system needs 4-inch PVC pipe or rain gutters ($15-25), end caps ($5), a submersible water pump ($10-15), vinyl tubing ($5), and a 5-gallon bucket reservoir ($5). Total cost is $40-55. Drill 3-4 inch holes every 6-8 inches along the pipe for net pots.
Can I grow large plants like tomatoes with Kratky?
It is difficult. Kratky is a set-and-forget method best suited for fast-growing greens like lettuce that can be harvested before the container runs dry. Large fruiting plants require massive reservoirs to sustain their water needs over a long season. Use DWC for tomatoes instead.
Should I refill the Kratky reservoir?
If you must refill, only fill halfway. Completely refilling to the top drowns the specialized air roots the plant has developed above the water line, essentially suffocating it. The air gap is critical for root oxygenation in the Kratky method.
Does a DIY hydroponic system attract mosquitoes?
Standing water can attract pests if left open. Ensure your container is completely light-proof and the net pot fits snugly in the hole to prevent pest access. Indoor systems rarely have mosquito issues. For outdoor Kratky setups, a fine mesh over any openings prevents egg-laying.
Related Articles
- Hydroponics for Beginners: Ultimate Guide — Complete getting started guide with step-by-step setup instructions
- Hydroponic Systems: Complete Guide to All Methods — Compare Kratky, DWC, NFT, and more to find your ideal growing system
- Hydroponics for Beginners
- Hydroponic Systems Explained
- Essential Hydroponic Equipment
- Best Plants for Hydroponic Growing
- Common Hydroponic Mistakes