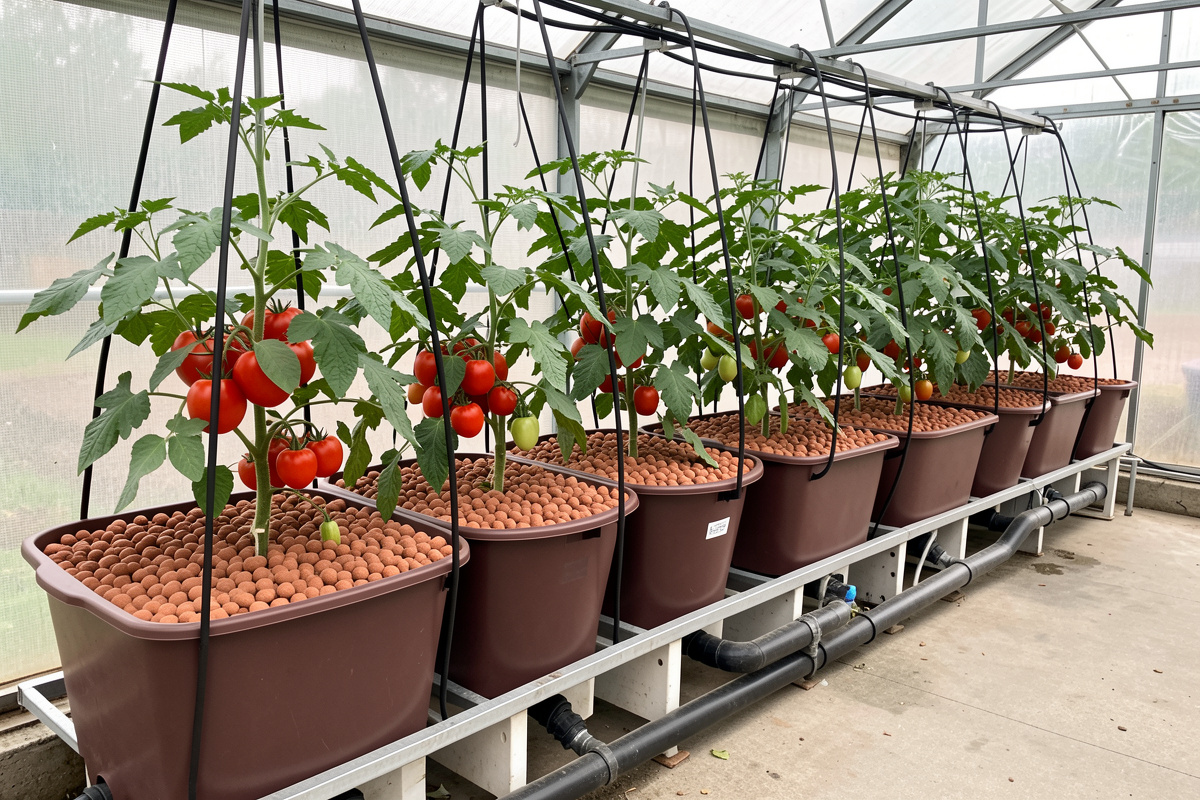
A Dutch bucket system — also called a bato bucket system — is drip hydroponics for big plants: each plant sits in its own bucket of clay pebbles, fed from above by a drip line, with a special elbow fitting at the base that keeps a shallow reservoir of solution in the bucket and drains the excess away. It is the method serious indoor growers use for tomatoes, cucumbers, peppers and other large fruiting crops, and on my bench it is what I run when a plant has simply outgrown what a flood tray or a DWC bucket can support. Where the other hobby methods are about leafy greens, Dutch buckets are about getting a single vining plant everything it needs for months.
The appeal is modularity and scale. Each bucket is independent, so you can run two or twenty off one reservoir, and you can pull a sick plant without disturbing the rest. The cost is plumbing: drip lines in, a drain manifold out, and emitters to keep clear. Here is how the system works and how I run mine.
How a Dutch Bucket Works
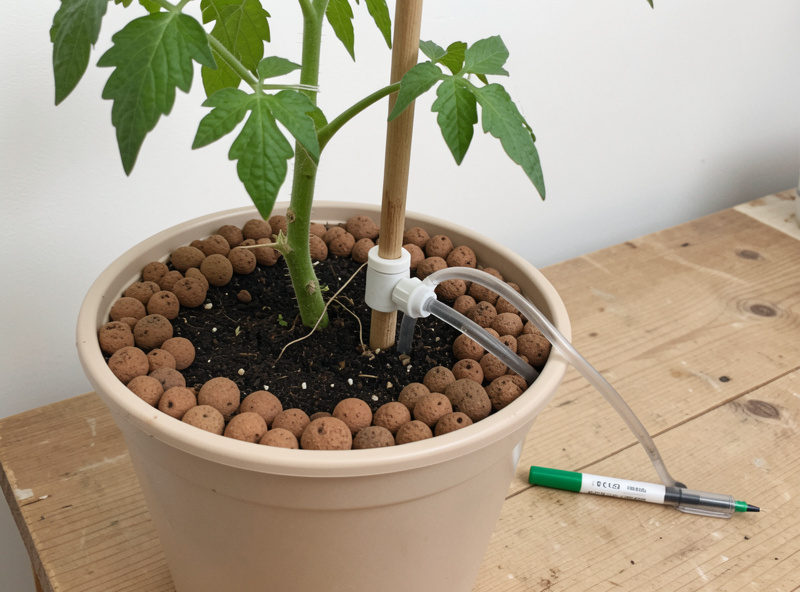
Each bucket is filled with an inert medium — clay pebbles are standard — and a plant goes in the top. A drip emitter on a stake delivers nutrient solution to the base of the stem on a timer, several times a day. The solution percolates down through the pebbles, feeding and watering the roots, and the excess collects at the bottom.
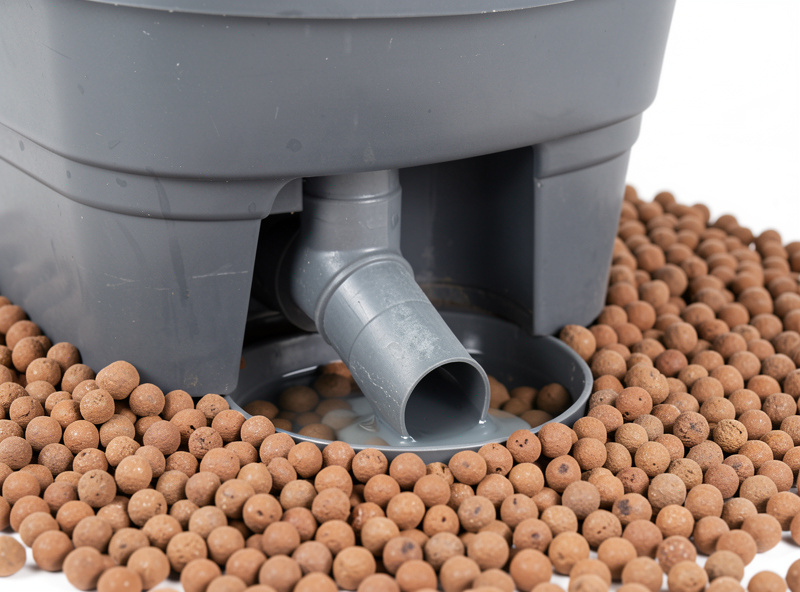
The clever part is the drain fitting. A Dutch bucket uses an elbow or siphon at the base set to hold a small reservoir of solution — usually an inch or two — in the bottom of the bucket, then drain anything above that level out to a shared return line. So the roots always have a shallow pool to draw from between drip cycles, while the medium above stays aerated. It is a hybrid: drip-fed at the top, with a tiny standing reservoir at the bottom for resilience. That combination is exactly why it suits thirsty, long-season plants.
That little bottom reservoir is doing more than buffering against a missed drip. It means the lower roots can sit in a small standing pool and behave a bit like a DWC root mass, drawing steadily, while the roots higher in the pebbles get the aerated, drip-fed treatment. You get two root environments in one bucket, which is a large part of why a vigorous tomato can run for months in one of these without the swings it would suffer in a system built around a single root condition. It is, in a sense, the most generalist of the methods — and that generalism is what big plants want.
Building a Dutch Bucket Row
The parts are simple but there are a few of them per bucket:
- Buckets with the bato drain fitting. Purpose-made bato buckets come with the elbow; you can also retrofit standard buckets with a siphon fitting.
- Clay pebbles. The same reusable hydroton used in ebb and flow — it drains fast, holds air, and supports a heavy plant.
- A drip system. A pump, a feed line, and a drip emitter per bucket on a timer. Pressure-compensating emitters keep every bucket getting the same flow.
- A drain manifold and reservoir. The drain fittings all return to a shared pipe back to the reservoir, so it recirculates.
- An EC pen and pH pen for the reservoir.
The drip side is where I focus, because a clogged emitter starves one plant while its neighbours thrive — an easy failure to miss. A reliable hydroponic drip irrigation kit with pressure-compensating emitters keeps the row even, and a sack of clay pebbles grow media fills several buckets and lasts for years. As an Amazon Associate I earn from qualifying purchases.
Dialling In the Drip
Dutch buckets are forgiving once the drip schedule and EC are right:
- Drip frequency: short, frequent feeds during lights-on — often several short cycles spread through the day — so the medium never dries and the bottom reservoir stays replenished. A big fruiting plant in summer drinks a lot, so I increase frequency as it matures.
- EC: fruiting crops run high; I hold tomatoes and cucumbers around 2.0–2.6 mS/cm and let leaf and fruit response fine-tune it. Because it recirculates, EC drifts, so I check the reservoir regularly.
- pH: the 5.5–6.0 band, same as my other systems, to keep nutrients available and avoid lockout.
- Runoff: a healthy Dutch bucket produces a little runoff from the drain on each cycle — that flushing is good, it stops salts building up in the medium. No runoff means the drip is too stingy.
In my logs the Dutch buckets that produce best are fed little and often with a slight runoff every cycle — that steady, flushing feed is what a heavy fruiting plant wants.
Dutch Buckets vs the Other Methods
Compared head-to-head with my other systems on fruiting crops, Dutch buckets win on plant size and modularity and cost you more plumbing.
| Factor | Dutch bucket | Ebb & flow | DWC |
|---|---|---|---|
| Best crops | Large vining fruiting crops | Fruiting in a shared bed | Greens and smaller fruiting |
| Modularity | Excellent (independent buckets) | Shared tray | Independent buckets |
| Per-plant isolation | High (pull one, keep the rest) | Low (shared medium) | Medium |
| Plumbing complexity | Higher (drip in, drain out) | Medium | Low |
| Outage tolerance | Medium (bottom reservoir buffers) | Medium | Low |
The reason I pick Dutch buckets over ebb and flow for the biggest plants is isolation and root room. A single bucket gives a vigorous tomato or cucumber its own dedicated medium and bottom reservoir, and if one plant gets root issues you lift that bucket out without risking the whole bed. For a couple of leafy greens this is overkill — but for a row of vining fruiters, it is the most scalable, manageable system I run.
What Goes Wrong
Dutch bucket problems are mostly drip-side:
- Clogged emitters. The classic failure — one plant wilts while the rest are fine. Use pressure-compensating emitters, filter the feed, and check flow at each bucket periodically.
- A blocked drain fitting. If the elbow clogs, the bucket floods and the roots drown. Keep the fitting clear and the pebbles rinsed of fines.
- No runoff. Too little drip lets salts concentrate in the medium and EC climb at the roots. Increase the feed until you see a small runoff each cycle.
- EC drift in the reservoir. It recirculates across many thirsty plants, so EC moves. Check it often and top off with plain pH-adjusted water before re-dosing.
- Disease spreading down the return line. Because every bucket shares one recirculating reservoir, a root pathogen in one bucket can travel to the rest. Keep the reservoir cool, the solution oxygenated, and consider an inline filter or steriliser on a larger row — the same root-rot discipline that protects a DWC res applies here at scale.
Are Dutch Buckets Right for You?
If you want to grow large fruiting crops indoors — tomatoes, cucumbers, peppers, even melons — and you like the idea of a modular row you can expand a bucket at a time, Dutch buckets are the method built for it. They ask for more plumbing and a drip schedule you will tune, but they handle the heaviest, longest-season plants better than anything else on this list. For leafy greens, stay with Kratky, DWC or NFT. For a serious fruiting grow, the Dutch bucket is where I would put it.
One last practical note: Dutch buckets reward a little planning before you build. Decide the spacing for a mature, sprawling plant rather than the seedling you start with, run the drip and drain lines with the buckets already spaced out, and leave yourself an extra emitter and a spare elbow fitting on the shelf. The system is modular by design, so the time to make it easy to expand and maintain is at the start — retrofitting a crowded row mid-season is the only genuinely annoying job this method hands you.
Frequently Asked Questions
What is the difference between a Dutch bucket and a bato bucket?
They are the same thing. Bato is a brand name that became the generic term for the system, and Dutch bucket is the common descriptive name. Both refer to a drip-fed bucket of medium with an elbow drain fitting that holds a shallow bottom reservoir.
What crops grow best in Dutch buckets?
Large, long-season fruiting crops: tomatoes, cucumbers, peppers, eggplant and even melons. The independent bucket gives each vigorous plant its own medium and bottom reservoir, which is why Dutch buckets are favoured for vining fruiters over shallow-water systems.
How often should a Dutch bucket drip?
Feed in short, frequent cycles during lights-on so the medium never dries and the bottom reservoir stays replenished. A mature fruiting plant in warm conditions drinks heavily, so increase frequency as it grows. Aim for a small runoff on each cycle.
Why is one plant in my Dutch bucket row wilting?
Almost always a clogged drip emitter starving that single bucket while the rest feed normally. Use pressure-compensating emitters, filter the feed line, and check the flow at each bucket. A blocked drain fitting causing flooding is the other common cause.
Do Dutch buckets recirculate the nutrient solution?
Yes, in most home setups. The drain fittings return excess solution to a shared reservoir that is pumped back through the drip lines. Because many thirsty plants share one reservoir, EC drifts over time, so check and adjust the reservoir regularly.