Spider mites in hydroponics are tiny sap-sucking pests that you usually find too late — the first sign is fine pale stippling on leaves, and by the time you see webbing on the undersides the infestation is serious. They thrive in hot, dry air below 50% humidity, which makes indoor winter grows a perfect breeding ground. Beat them by raising humidity, spraying undersides with neem, and releasing predatory mites for real outbreaks.
Spider mites are the pest that has humbled me more than any other, because they’re nearly invisible until the population explodes. They’re not insects but arachnids, barely the size of a pinhead, and they breed astonishingly fast in the warm, dry air right under grow lights. Across the methods I run, I’ve learned that the whole game is catching them early with a loupe and making the environment hostile before they take hold. This guide covers how to spot them, why your grow attracts them, and the controls that actually clear them, with the spray rate I mix on my own bench. For where mites fit among the other things that go wrong, see my complete hydroponic pests and diseases guide.
Disclosure: SmartHydroLab is reader-supported. As an Amazon Associate I earn from qualifying purchases made through links in this article, at no extra cost to you. I only point to gear I actually use or would buy for my own grow.
How to Spot Spider Mites Early
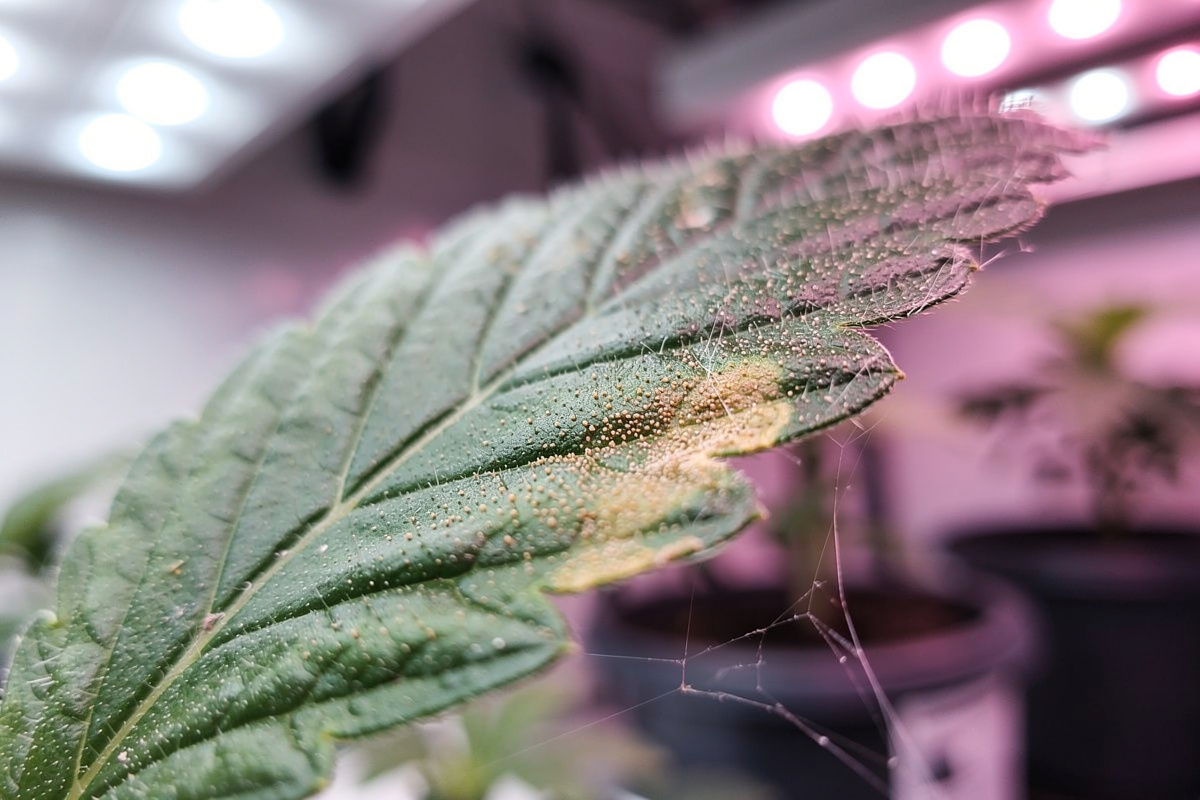
Spider mites are nearly impossible to see with the naked eye, so you diagnose them by their damage. The earliest sign is fine pale stippling across the leaves — tiny pinprick dots where mites have pierced cells and sucked the contents, giving the leaf a faintly speckled, dusty look. As the population grows, leaves turn bronze or yellow and dry out. By the time you see the tell-tale fine silken webbing on leaf undersides and between stems, you have a heavy, established infestation.
This is why a loupe is the single best tool against them. I check the undersides of leaves with a magnifier weekly, looking for the mites themselves — tiny moving specks, often with two dark spots (the two-spotted spider mite is the usual culprit) — and for their pale eggs. Catching them at the first faint stippling, before any webbing, is the difference between a quick fix and a multi-week war. Don’t confuse mite stippling with a nutrient deficiency: deficiencies follow a leaf-position pattern, while mite damage is a random scatter of tiny dots, usually with mites visible underneath.
Why Spider Mites Love Your Grow
Spider mites are a hot-and-dry pest. They thrive when humidity drops below about 50% and temperatures are warm, because those conditions let them reproduce explosively — in the heat under grow lights, eggs can hatch in just a few days and a population can double in under a week. That speed is what makes them so dangerous: a handful of mites becomes a webbed-over plant faster than you’d believe.
Indoor grows, especially in winter, hand them everything they want. The air near the fixtures runs hot, and heated indoor air in a cold climate runs bone-dry — my Nordic winter grow room is exactly the warm, low-humidity environment mites dream of. That’s the lever you pull first: raising humidity and keeping the canopy from baking makes the environment far less favorable and slows their reproduction dramatically. They also hitch in on new plants, which is why quarantining transplants matters. Understand that they’re driven by heat and dryness and you know which dial to turn before you reach for any spray.

How to Treat a Spider Mite Infestation
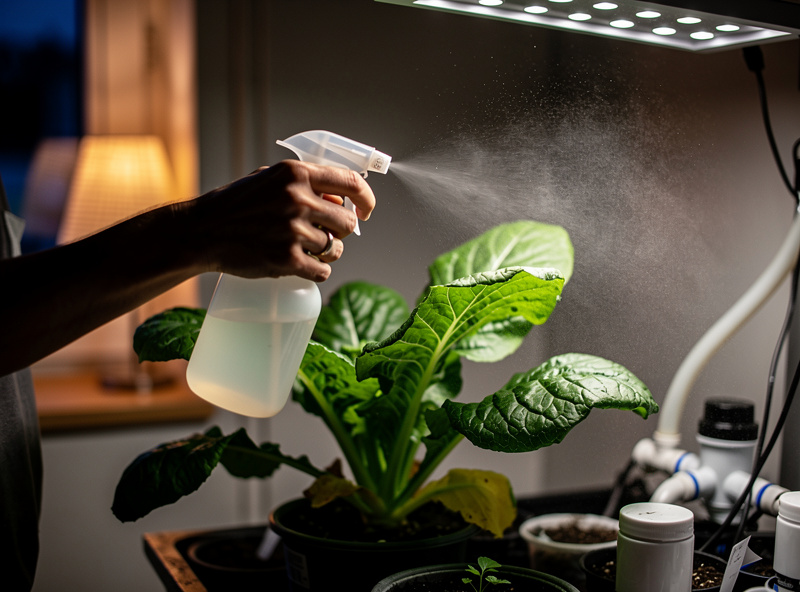
Once you’ve confirmed mites, act fast and accept that you’re in for repeat treatments, because no single spray kills the eggs. First, isolate the affected plant if you can, to slow spread to the rest of the grow. Then knock the population down physically: a firm spray of plain water on the leaf undersides dislodges a lot of mites and webbing. Raise the humidity and improve airflow to make the environment hostile.
For the chemical front, a thorough neem oil spray works as a repellent and growth disruptor: about 1 teaspoon (5 mL) of cold-pressed neem oil plus a few drops of mild soap per liter of warm water, roughly a 0.5% solution, applied to the undersides of leaves where mites live. Insecticidal soap is a good alternative that kills on contact. The two non-negotiable rules: spray the undersides, not just the tops, because that’s where mites and eggs are; and spray with lights off or in the evening so the oil or soap doesn’t scorch foliage under hot light. Repeat every three to five days for at least two to three weeks — you’re catching each new hatch of eggs the previous spray couldn’t kill.
Predatory Mites: The Biological Knockout
For a real outbreak, the control that actually clears spider mites is biological: release predatory mites that hunt and eat them. Predatory mites like Phytoseiulus persimilis are voracious spider-mite specialists — they devour the pest mites and their eggs, then die off naturally once the prey is gone, leaving nothing to clean up. Neoseiulus californicus is a tougher, more heat-and-drought-tolerant option that survives leaner conditions and works well as a preventive seeding.
The logic is the same one I use for beneficial bacteria against root rot: establish the organism you want and let it do the work biology does better than I can with a spray bottle. The one caveat is compatibility — don’t release predatory mites right after a neem or soap spray, because the residue can harm them too; pick the biological route or the spray route for a given push, not both at once. For a contained indoor grow, predators plus raised humidity is often the cleanest path to a mite-free canopy, and unlike repeat spraying it doesn’t stress the plants. It’s the approach I lean on when stippling has turned into webbing.
Spider Mite Controls Compared
Here’s how the controls line up so you can match the response to how far the infestation has progressed.
| Control | How It Works | Best Use | Key Caveat |
|---|---|---|---|
| Raise humidity above 50% | Slows mite reproduction | Prevention and first response | Balance against mildew risk |
| Water spray on undersides | Physically dislodges mites | Quick knockdown, any stage | Temporary; repeat often |
| Neem oil (0.5%) | Repels and disrupts growth | Light to moderate infestations | Undersides, lights off only |
| Insecticidal soap | Kills mites on contact | Knockdown spray, repeat | Does not kill eggs |
| Predatory mites | Eat mites and their eggs | Real outbreaks, webbing stage | Not alongside neem or soap |
| Isolate infested plants | Limits spread | First step of any response | Check neighbors for mites too |
Preventing Spider Mites
Prevention comes down to denying mites the hot, dry, undisturbed conditions they need. Keep humidity from crashing — in a dry indoor winter grow, that may mean actively adding moisture — and avoid letting the canopy bake under lights. Scout weekly with a loupe on the leaf undersides so you catch the first stippling while it’s trivial. Quarantine every new plant for a week, since bought-in transplants are the most common way mites enter a clean room.
There’s a genuine tension to manage here: spider mites want low humidity, but powdery mildew wants high humidity, so you’re threading the needle between roughly 50% and 60% relative humidity with good airflow to keep both unhappy. That’s the same instrument-driven approach I take to reservoir temperature and EC — monitor the number, don’t guess. Different crops vary in how readily mites take to them, which my plant growing guide covers, but consistent humidity, airflow, weekly scouting, and quarantine protect them all. Spider mites are beatable; they just punish anyone who waits until the webbing shows.

Frequently Asked Questions
How do I know if I have spider mites in hydroponics?
The first sign is fine pale stippling on leaves, tiny dots where mites pierced cells. Check leaf undersides with a loupe for tiny moving specks and pale eggs. Fine silken webbing on undersides means a heavy, established infestation that needs immediate action.
How do I get rid of spider mites in hydroponics?
Isolate the plant, spray water on leaf undersides to dislodge mites, and raise humidity. Treat undersides with neem oil at 0.5% or insecticidal soap, lights off, repeating every three to five days for two to three weeks. For outbreaks, release predatory mites.
What humidity do spider mites hate?
Spider mites thrive in dry air below 50% humidity, so raising relative humidity above 50% slows their reproduction sharply. Aim for 50 to 60% with good airflow, which keeps mites unhappy without crossing into the high humidity that invites powdery mildew.
Does neem oil kill spider mites?
Neem oil repels spider mites and disrupts their growth and reproduction. Mix about 5 mL of cold-pressed neem oil plus a few drops of soap per liter of warm water and spray the leaf undersides with lights off. It does not kill eggs, so repeat every few days.
What are the best predatory mites for spider mites?
Phytoseiulus persimilis is a voracious spider-mite specialist that eats mites and eggs, then dies off when prey is gone. Neoseiulus californicus is more heat and drought tolerant and works as a preventive. Do not release them right after a neem or soap spray.
How long does it take to get rid of spider mites?
Expect two to three weeks of repeated treatment, because no single spray kills the eggs. Spray every three to five days to catch each new hatch, while keeping humidity up. Predatory mites can clear an outbreak in a similar window without repeated spraying.