The reservoir is the part of a hydroponic system every beginner ignores and every experienced grower obsesses over. It is the single tank that holds your water, your nutrients, your dissolved oxygen, and your temperature all at once, which means it is also where almost every avoidable crop failure starts. Get the reservoir right and the plants mostly take care of themselves; get it wrong and no nutrient brand on the shelf will save you. On my bench I run DWC, NFT, Kratky and ebb-and-flow side by side, and the one variable that separates a healthy res from a slimy, root-rotting one is never the fertilizer — it is reservoir management.
This guide pulls together everything I have logged across years of res changes: how to size a reservoir for your crop and climate, how to hold water temperature in the safe band, how to keep dissolved oxygen high, how to handle evaporation and the EC creep it causes, and the cleaning and water-change cadence that keeps a tank from turning on you. It is the pillar for a whole cluster of deeper articles, and I will point you to each one as we go.
What a Hydroponic Reservoir Actually Does
A hydroponic reservoir is the water tank that stores and circulates the nutrient solution feeding your plants. It controls four things at once — volume, temperature, dissolved oxygen, and nutrient concentration (EC) — and stability in all four is what keeps roots healthy. A 20-gallon res buffers swings far better than a 5-gallon one.
Think of the reservoir the way I think of a sourdough starter: the ingredients matter, but a clean, stable process beats fancy additives every time. The water in the tank is not static. Plants drink it, evaporation lifts it, the air pump churns it, and warm-season heat tries to cook it. Every one of those forces moves a number you care about. The whole job of reservoir management is keeping those numbers inside the bands the roots tolerate, and the bigger and more thermally stable the tank, the wider your margin for error. That is why my daily workhorse is a row of opaque totes and buckets rather than the tiny clear jars people start with — opacity kills algae, and volume kills volatility.
Sizing the Reservoir: Volume Is Your Buffer
Size the reservoir to roughly 0.5–2.5 gallons of solution per plant depending on crop size: leafy greens sit at the low end, fruiting crops like tomatoes and peppers at the high end. Bigger tanks drift slower in temperature, pH, and EC, so when in doubt, size up — a larger res is the cheapest stability you can buy.
The reason volume matters so much is thermal and chemical inertia. A small tank heats up fast in a warm room and crashes EC the moment plants drink hard; a large one shrugs both off. For a typical DWC lettuce raft I run around a gallon per site; for a flowering pepper in the ebb-and-flow bed I want several gallons of standing solution behind it. The other half of sizing is run-time: a reservoir should hold enough that you are not topping off twice a day, because every top-off is a chance to drift your EC. There is also a climate factor most warm-region channels never mention. In my short-daylight Nordic winters plants transpire less and the room is cool, so a res holds its level for longer; under a hot summer tent the same tank can drop noticeably in a day. Size for your worst case, not your average one — the cost of a slightly oversized tank is a few extra liters of nutrient solution, while the cost of an undersized one is daily babysitting and a res that swings every time the plants get thirsty. I go deep on the per-crop math, headroom, the difference between system volume and total reservoir volume, and tank shape in the dedicated reservoir sizing guide, and the physical build itself in the reservoir setup and DIY walkthrough.
Water Temperature: The Variable I Check First
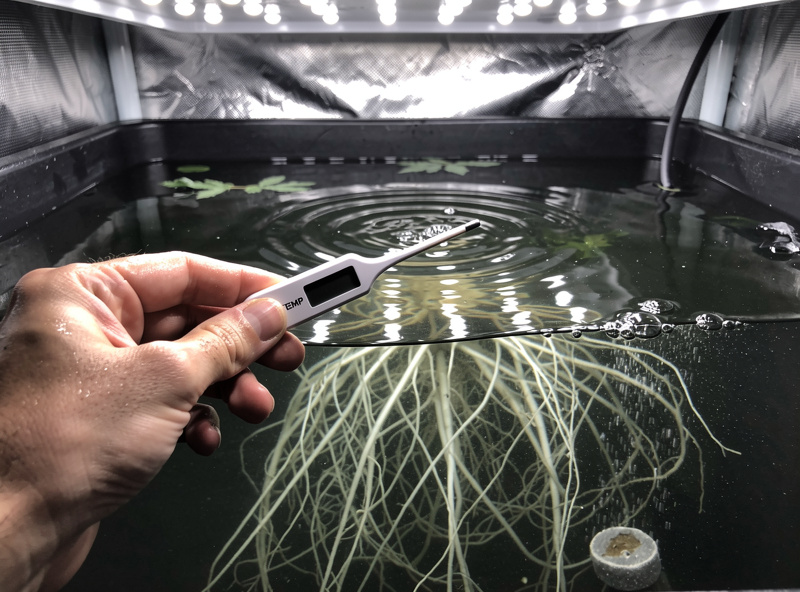
Keep reservoir water between about 65–68°F (18–20°C). Below 72°F (22°C) Pythium and root rot stay suppressed; above that the danger zone opens fast because warm water holds far less dissolved oxygen. Cold water below 60°F slows nutrient uptake but is safer than hot. Temperature is the master variable.
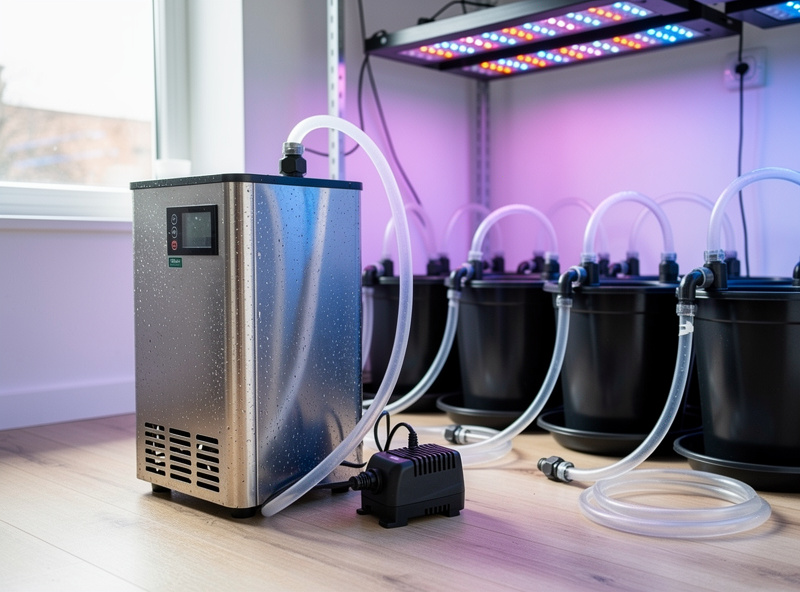
Here is the part most appliance marketing skips: warm water and low oxygen are the same problem. As water warms, its capacity to hold dissolved oxygen drops, so a hot res starves roots and breeds anaerobic pathogens simultaneously. In my short-summer Nordic grow room I rarely fight heat, but a sealed tent in July is another story — that is when a chiller earns its keep. On the cold side, a cheap aquarium heater holds a winter res steady so uptake does not stall. My full playbook on chillers, heaters, frozen-bottle hacks, insulation, and the exact thresholds lives in the water temperature control guide. The temperature link to root rot is also why my Pythium prevention article leans so hard on keeping the res cool.
| Reservoir Temp | Dissolved O₂ Capacity | Root Health Risk | What I Do |
|---|---|---|---|
| Below 60°F (15°C) | High | Slow uptake, low rot risk | Add aquarium heater |
| 65–68°F (18–20°C) | Optimal | Ideal band | Hold steady, monitor |
| 68–72°F (20–22°C) | Falling | Caution | Increase aeration, watch closely |
| Above 72°F (22°C) | Low | High — Pythium danger zone | Chiller, ice bottles, insulate |
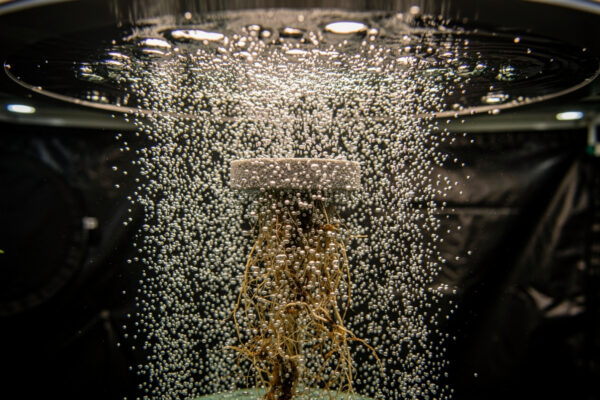
Dissolved Oxygen: Roots Breathe Through the Water
Roots need dissolved oxygen to respire, and in hydroponics the only source is the water itself. Aim to keep the reservoir near oxygen saturation by running air stones 24/7 and holding water below 68°F. Warm, still water suffocates roots and invites root rot within days — aeration is non-negotiable in DWC.
In a deep-water-culture tote the roots are submerged full-time, so the bubble curtain off the air stone is literally the plant’s lungs. I run air pumps and stones around the clock on every recirculating and standalone DWC build, and on larger tanks I step up to disc diffusers for a finer bubble. Oxygen and temperature are joined at the hip — every degree warmer is less oxygen in solution — which is why the temperature table above doubles as an oxygen table. The deep dive on sizing air pumps, choosing stones versus diffusers, reading the symptoms of an oxygen-starved root mass, and why I never trust still water covers it all in the dissolved oxygen guide.
Top-Off and EC Drift: The Slow Killer
As water evaporates and plants transpire, the reservoir level drops but most dissolved salts stay behind, so EC climbs steadily — this is EC drift. Top off with plain pH-adjusted water (not full-strength nutrients) to dilute back toward target, and check EC after every top-off. Drift is the slow killer growers miss.
This is the trap that catches careful growers. You mixed a perfect res on Sunday, the plants drank and the room evaporated some off, and by Thursday the EC pen reads high and a leaf is tip-burning — not because you over-fed, but because the water left and the salts did not. The fix is disciplined: top off with plain water to restore volume, let it mix, then read EC and only adjust if it is still off. I treat top-off water and nutrient water as two different jobs. This is strictly reservoir water management — nutrient *formulation* is a separate topic I cover in the nutrient guide. The mechanics of evaporation, top-off cadence, and reading drift correctly are in the top-off and EC drift guide, and the meter technique itself is in how to read and calibrate an EC meter.
Cleaning and Sterilizing the Reservoir
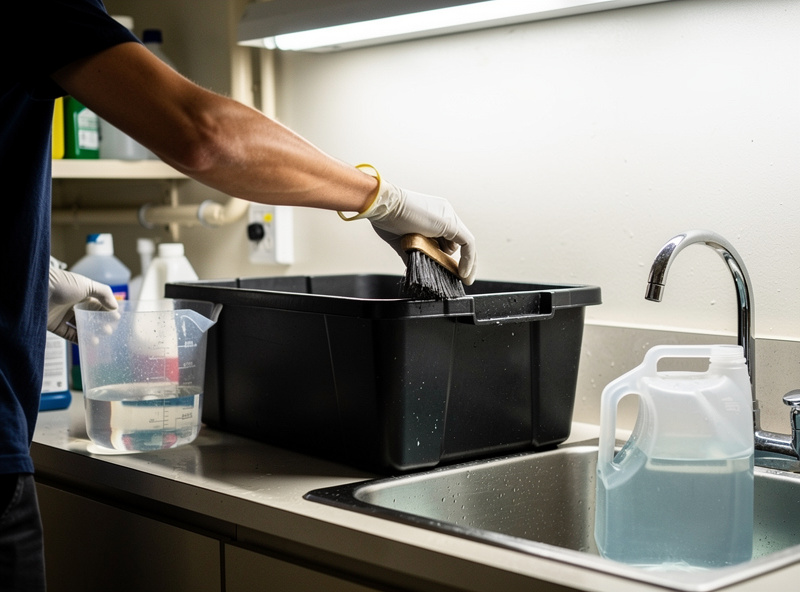
Clean and sterilize the reservoir at every full water change — scrub off biofilm, then sanitize with a diluted hydrogen peroxide or bleach rinse and flush thoroughly before refilling. Biofilm and algae harbor pathogens and clog air stones, so a clean tank is the cheapest disease prevention in hydroponics.
Biofilm is the slick coating you feel when you run a finger inside a neglected tank, and it is where trouble breeds. Between crops I empty the res, scrub every surface, sanitize, and rinse until there is no smell of cleaner left. A one-time 3% hydrogen peroxide reset also clears algae and resets a struggling tank — but it kills beneficial bacteria too, so I never mix it with a live Bacillus inoculant. The full sterilization process, what to use on opaque versus clear tanks, and how to keep air stones clean is in the reservoir cleaning and sterilization guide, and the algae angle ties into my getting-rid-of-algae article.
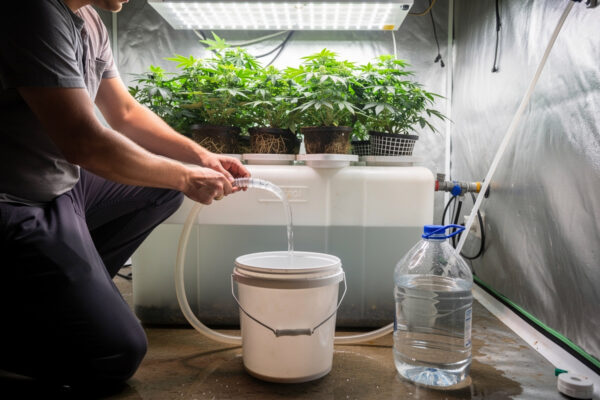
Water Change Schedule: How Often to Dump and Refill
Change the full reservoir every 1–2 weeks for most crops, or sooner if EC drifts badly, pH gets unstable, or the water smells off. Topping off maintains volume between changes; a full change resets accumulated salt imbalances and refreshes oxygen. Small reservoirs need changing more often than large ones.
Top-off and full water change are two different maintenance jobs people conflate. Topping off keeps the level up day to day; a full change dumps the whole tank to clear the salt imbalances that top-off cannot fix, because plants take up nutrients unevenly and leave certain salts behind. My cadence flexes with res size and crop stage — a small lettuce tote in heavy growth gets changed weekly, a large fruiting res can stretch to two. The signals that override the calendar (runaway EC, a sour smell, an unstable pH) and the step-by-step change routine are in the water change schedule guide.
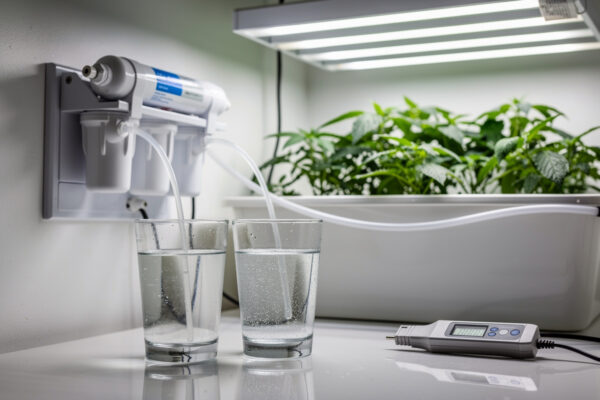
Water Source: RO vs Tap for Your Reservoir
Tap water works for most hydroponics if it is under about 200 ppm starting EC and not heavily chlorinated; reverse-osmosis (RO) water gives you a clean zero baseline for precise feeding and is worth it in hard-water areas. Always measure your tap’s starting EC before deciding — that number changes everything downstream.
The argument for RO is control: starting from near-zero EC means every point on your meter comes from nutrients you added, not from whatever minerals your municipality runs. The argument for tap is cost and simplicity, and in a soft-water region good tap is perfectly fine. The deciding factor is your starting EC and hardness — measure it first. Hard tap loaded with calcium and magnesium can throw off your CalMag math; very soft or RO water may need CalMag added back. There is also chlorine and chloramine to think about — a brief stand or an air-stone session off-gasses chlorine, but chloramine is stubborn and needs different handling, which matters more for the beneficial bacteria in a recirculating build than for the plants themselves. The honest answer is that most growers in a soft-water town never need RO, and most growers fighting hard water and stubborn pH would solve half their headaches by switching. I walk through testing your source, reading a water-quality report, when RO actually pays off, and how to remineralize a near-zero baseline in the RO vs tap water guide.
How the Reservoir Connects to Everything Else
No reservoir lives in isolation. The tank feeds whichever system you run, and the demands shift with the method. A recirculating DWC leans hardest on temperature and oxygen control; an NFT channel cares about flow and film depth off the same res; a passive Kratky tote needs no pump but every bit of starting volume; an ebb-and-flow bed pulls from and drains back to the res on a timer. If you are still choosing, my complete guide to hydroponic systems compares all of them, and the gear that connects the res to the plants is covered in the equipment buying guide. New growers should start with the beginners getting-started guide before sweating reservoir details.
A reservoir is also a control loop, the same way a smart-home rig is: sensors, a schedule, and intervention only when the loop drifts out of band. That is the whole philosophy behind monitoring a res with Wi-Fi pH, EC and temperature sensors, and behind keeping the pumps running through outages with off-grid solar and battery sizing. When the loop does fail, the failure almost always traces back to the tank — which is why most entries in my common mistakes article and the whole pest and disease guide start at the reservoir.
Anatomy of a Reservoir That Holds Steady
A reliable reservoir comes down to five parts: an opaque tank to block algae, a sealed lid to cut evaporation and light, an air pump with stones for oxygen, a circulation path so the solution does not stratify, and a place to drop a thermometer and a meter probe. Opacity and a tight lid alone solve half the problems beginners write to me about. For the simplest reservoir setup of all — no pump, no airstones, just the right starting volume — the Kratky method guide explains the air gap technique and when to top off without disrupting the passive nutrient uptake cycle.
I am picky about opacity because clear or translucent tanks let light reach the solution, and light plus nutrients equals algae — a green slime that fouls air stones, competes for oxygen, and shelters pathogens. A solid black tote, or a clear tote wrapped in reflective panda film, ends that fight before it starts. The lid does double duty: it slashes evaporation (which slows EC drift) and seals out light at the surface where algae loves to colonize. This is exactly where my maker bench pays off — I print my own reservoir lids, net-pot collars, and probe mounts on the same 3D printer that prints hose guides for the rest of the network, so every tank gets a tight, custom-fit top with the holes exactly where I want them. You do not need a printer to do this well, but you do need to think about the lid as a real component, not an afterthought. I cover the physical build, drilling net-pot holes, and routing tubing in the reservoir setup and DIY guide.
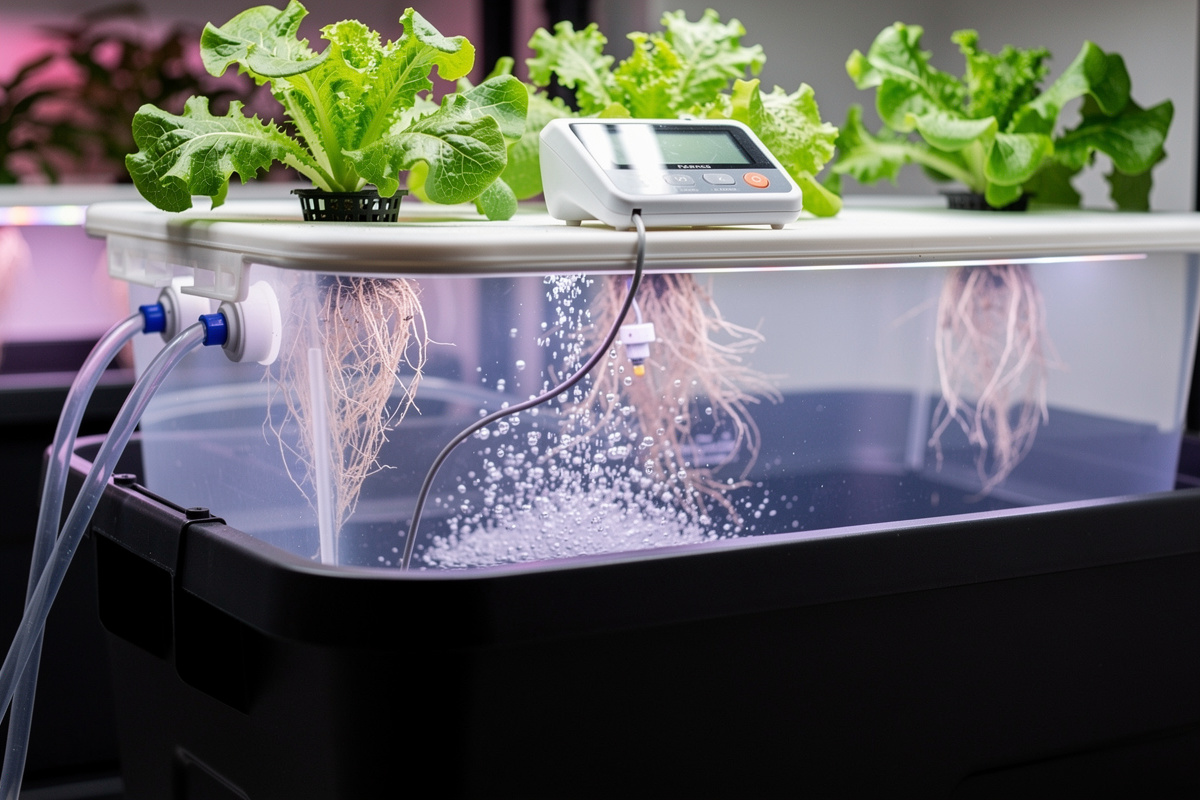
My Reservoir Monitoring Routine
I check three numbers on every reservoir: temperature, EC, and pH. Temperature first because it drives oxygen and disease risk, then EC to catch drift, then pH because it determines whether nutrients are even available to the roots. Logging those three over time turns guesswork into a control loop you can actually steer.
The routine is simple and it never changes: probe the water temperature, read EC, read pH, and write all three down with the date. On their own a single reading tells you little; the value is in the trend. A res that climbs half a point of EC a day is telling you evaporation is outrunning your top-offs. A pH that will not hold steady is telling you the tank is small, the buffer is gone, or something biological is happening. I keep res logs the way other people keep a training diary, and after a few weeks the patterns are obvious. I cross-check my EC pen against a benchtop meter and my pH pen against drops, because a meter that has drifted out of calibration is worse than no meter — it lies with confidence. The calibration discipline and how to read the pen correctly are in the EC meter guide, and the smart-sensor version of this loop, where Wi-Fi probes log it for you, is in the hydroponic sensors guide. If pH lockout is throwing false deficiency symptoms, the nutrient guide untangles which is which.
Troubleshooting a Problem Reservoir
When a reservoir goes wrong, the symptom usually points straight at the cause: brown slimy roots and a swampy smell mean warm water and low oxygen (root rot); green water means light is reaching the solution (algae); steadily rising EC means evaporation outpacing top-off; an unstable pH means too little volume or buffering. Diagnose the tank, not the plant.
The mistake I see most often is treating reservoir symptoms as nutrient problems and reaching for another bottle. Tip-burn on a leaf is far more often runaway EC from evaporation than a real deficiency. Sad, slow plants in summer are far more often a hot, oxygen-starved res than a feeding issue. A reservoir that smells sour is a reservoir that has gone anaerobic, and the fix is oxygen and a temperature drop, not fertilizer. Walk the tank through the four big variables — temperature, oxygen, EC, and pH — before you touch the nutrient mix. Most of the failures cataloged in my common mistakes article trace back to one of those four, and the disease side of it, from Pythium to algae, is laid out in the pest and disease guide, the root rot article, and the algae article. Get the reservoir stable and the plants almost always recover on their own.
Frequently Asked Questions
How big should my hydroponic reservoir be?
Size for roughly 0.5 to 2.5 gallons of solution per plant: leafy greens at the low end, fruiting crops like tomatoes at the high end. Larger reservoirs drift slower in temperature, pH and EC, so size up when in doubt.
What temperature should hydroponic reservoir water be?
Hold reservoir water between 65 and 68 degrees Fahrenheit (18 to 20 Celsius). Below 72F suppresses Pythium and root rot; above that, warm water loses oxygen and the danger zone opens fast.
Why does my reservoir EC keep rising?
Evaporation and transpiration remove water while most dissolved salts stay behind, so EC climbs. Top off with plain pH-adjusted water, not full-strength nutrients, then re-check EC. This is normal EC drift, not over-feeding.
How often should I change hydroponic reservoir water?
Do a full water change every one to two weeks for most crops, sooner if EC drifts badly, pH gets unstable, or the water smells off. Top off in between to maintain volume; a full change resets salt imbalances.
Do I need RO water for hydroponics?
Not always. Tap water under about 200 ppm starting EC and not heavily chlorinated works fine. RO is worth it in hard-water areas for a clean zero baseline. Measure your tap EC first before deciding.
Why do I need an air pump in my reservoir?
Roots respire using dissolved oxygen, and the only source in hydroponics is the water. Air stones running 24/7 keep oxygen near saturation; warm, still water suffocates roots and breeds root rot within days, especially in DWC.