Hydroponics is the fastest, most efficient way to grow fresh vegetables at home—even if you have no outdoor space, no soil, and no gardening experience. This guide will take you from complete beginner to confident grower, with everything you need to know to start your first hydroponic garden today.
Unlike traditional gardening, hydroponics eliminates the biggest frustrations: weeding, pests, inconsistent weather, and slow growth. Plants grow 30-50% faster in hydroponic systems while using 90% less water. You can harvest fresh lettuce in 30 days, basil in 4 weeks, and cherry tomatoes year-round regardless of season.
This comprehensive guide covers the fundamentals, helps you choose your first system, walks you through setup step-by-step, and prepares you to avoid the mistakes that frustrate most beginners.
What Is Hydroponics and Why Should You Care?
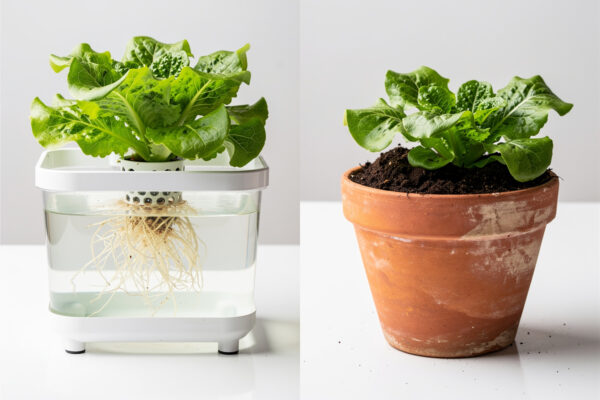
Hydroponics is simply growing plants without soil. Instead of extracting nutrients from dirt, plants receive everything they need directly through water-based nutrient solutions. The roots either sit in the solution itself or in an inert growing medium that provides support while the nutrients flow past.
This method is not new—scientists have studied hydroponics for over a century, and commercial growers have used it for decades to produce the fresh herbs and lettuce you see in grocery stores. What has changed is accessibility. Modern equipment, affordable LED grow lights, and proven nutrient formulas now make hydroponics practical for anyone with a spare corner and curiosity.
The Science Behind Faster Growth
Plants grown in soil must expend significant energy growing root systems to search for water and nutrients. A tomato plant in soil might devote 60% of its growth effort to root expansion, leaving only 40% for leaves, stems, and fruit. In hydroponics, nutrients are immediately available, so plants can focus nearly all their energy on above-ground growth.
This explains the 30-50% faster growth rates. It also explains why hydroponic plants often produce higher yields—more energy directed toward edible portions means more food per plant.
Water Efficiency That Matters
Traditional soil gardening wastes tremendous amounts of water. Much of what you pour onto soil evaporates from the surface, drains below the root zone, or runs off entirely. Plants might access only 10% of the water applied.
Hydroponic systems recirculate water. What plants do not immediately absorb returns to the reservoir for reuse. The only water loss is through plant transpiration—the natural process of moisture release from leaves that occurs with any growing method. This closed-loop approach uses up to 90% less water while producing equal or greater yields.
In drought-prone regions or for gardeners concerned with sustainability, this efficiency makes hydroponics the responsible choice.
Common Hydroponic Systems for Beginners
Not all hydroponic systems are equal. Some require technical skill and constant monitoring. Others are so simple they practically run themselves. As a beginner, you want the latter—systems that forgive mistakes while teaching you fundamentals.
| System | Difficulty | Setup Cost | Best Crops | Power Needed | Growth Speed |
|---|---|---|---|---|---|
| Kratky (Passive) | Very Easy | $15-25 | Lettuce, herbs, greens | No | Fast |
| Deep Water Culture | Easy | $40-60 | All plants including tomatoes | Yes (air pump) | Very Fast |
| NFT Channels | Moderate | $80-150 | Lettuce, herbs (high volume) | Yes (water pump) | Very Fast |
Kratky Method: The Absolute Easiest
Kratky Method: The Absolute Easiest
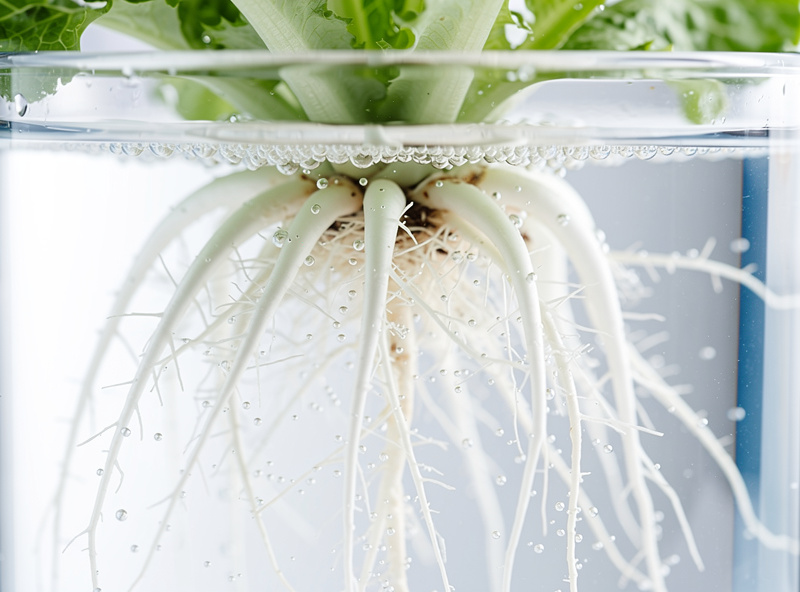
The Kratky method requires no pumps, no electricity, and no moving parts. You fill a container with nutrient solution, place a plant in a net pot suspended above the water, and walk away. As plants drink, the water level drops, automatically exposing roots to both water and air.
This passive approach works because plants adapt. Roots submerged in water absorb nutrients. Roots in the air gap above the water absorb oxygen. The system maintains this balance automatically until the reservoir empties.
Best for: Lettuce, herbs, and leafy greens. Perfect for testing hydroponics without investment.
Limitations: Small reservoir limits plant size and duration. Not suitable for large fruiting plants like tomatoes.
Deep Water Culture (DWC): The Beginner Standard
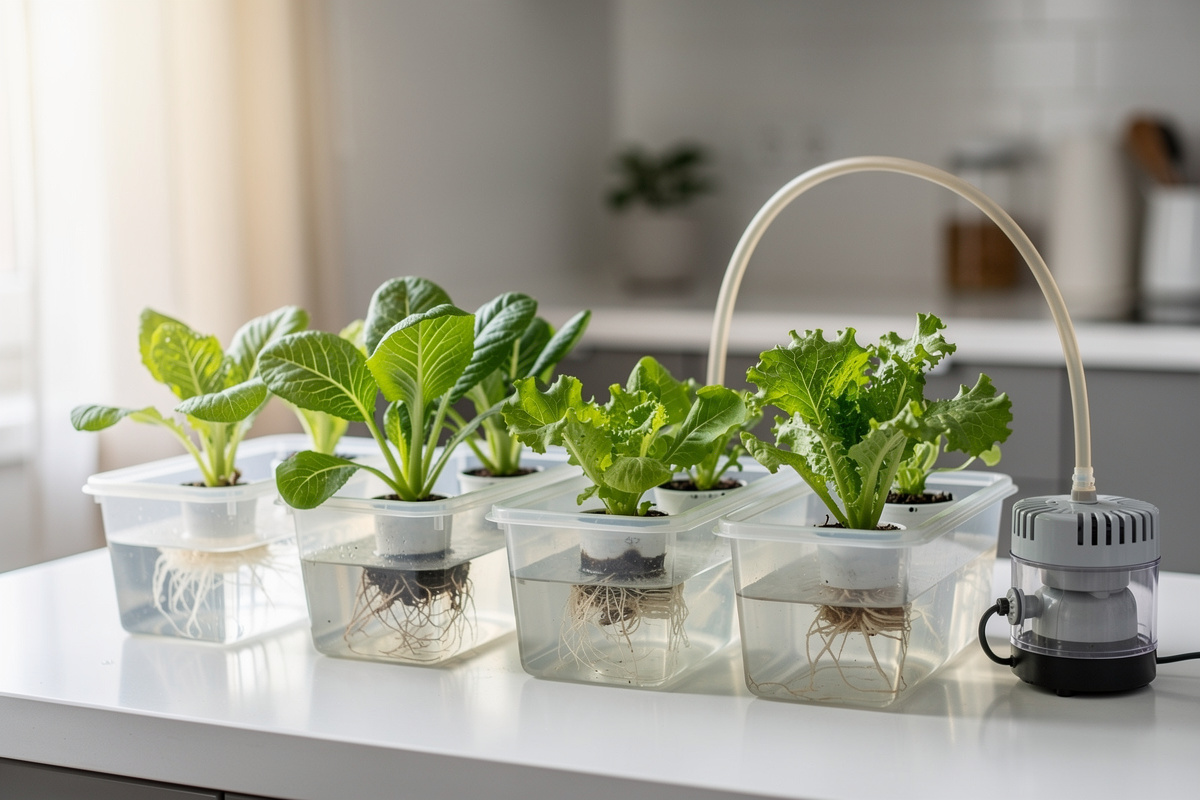
Deep Water Culture is the most popular system for new hydroponic growers. A plant sits in a net pot suspended over a reservoir. An air pump bubbles oxygen continuously into the water, keeping roots healthy and preventing the rot that would occur in stagnant water.
DWC offers the perfect balance of simplicity and capability. Setup takes under an hour. Maintenance requires only weekly pH checks and occasional reservoir changes. Yet this simple system grows everything from lettuce to full-size tomatoes.
The constant oxygen supply from the air pump makes DWC far more robust than passive systems. Roots have unlimited access to both nutrients and oxygen—the ideal conditions for explosive growth.
Best for: All beginners. Grows any plant from herbs to tomatoes.
Requirements: Air pump, air stone, 5-gallon bucket, net pot, and growing medium.
Nutrient Film Technique (NFT): For the Ambitious
NFT systems channel a thin film of nutrient solution over plant roots arranged in sloped pipes or channels. The solution flows continuously, providing both nutrients and oxygen as it passes.
This method is more complex than DWC but offers excellent efficiency and scalability. Commercial lettuce operations worldwide use NFT because it produces clean, consistent crops at high density.
Beginners can succeed with NFT, but the learning curve is steeper. Pump failures quickly kill plants. Channel slope and flow rate require precise adjustment. Start with DWC, then graduate to NFT after you understand hydroponic fundamentals.
Best for: Lettuce, herbs, and leafy greens in larger quantities.
Requirements: Water pump, channels or pipes, reservoir, and careful monitoring.
What You Actually Need to Get Started
Hydroponic stores sell hundreds of products, most unnecessary for beginners. You need only five essential components to grow your first plants successfully. Everything else improves convenience or scalability but is not required to start.
1. A Container and Net Pot
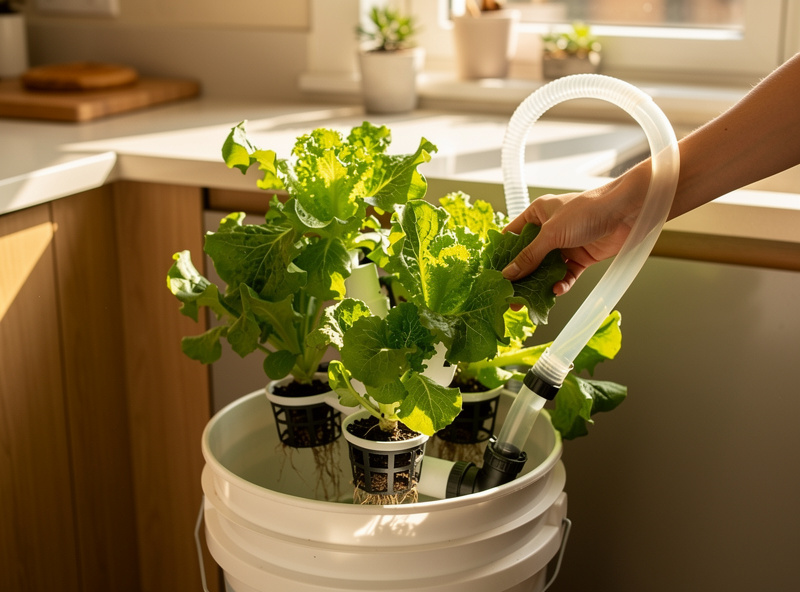
For your first grow, use a 5-gallon bucket with lid from any hardware store. Drill a hole in the lid sized to hold a 6-inch net pot. The bucket holds your nutrient solution. The net pot holds your plant and growing medium suspended above the water.
Painting the bucket black or wrapping it in light-blocking material prevents algae growth. Light in the reservoir causes problems you can easily avoid with this simple step.
2. Growing Medium
Since roots have no soil for support, you need an inert growing medium. Clay pebbles (also called LECA or hydroton) are the beginner-friendly choice. They provide excellent drainage, hold moisture between reservoir changes, anchor plants securely, and rinse clean for reuse.
Other options include rockwool cubes for starting seeds and perlite for budget-conscious growers. But clay pebbles offer the best balance of performance and forgiveness for first-time growers.
3. Hydroponic Nutrients
Standard garden fertilizer will not work. Hydroponic nutrients are formulated to dissolve completely without clogging systems, provide all essential micronutrients, and maintain stable pH. General Hydroponics Flora Series is the industry standard—proven, widely available, and well-documented.
Start with the three-part system: FloraGro for vegetative growth, FloraBloom for flowering and fruiting, and FloraMicro for micronutrients and base nutrition. Follow the feeding chart on the bottle, starting at half strength for seedlings.
4. pH Testing and Adjustment
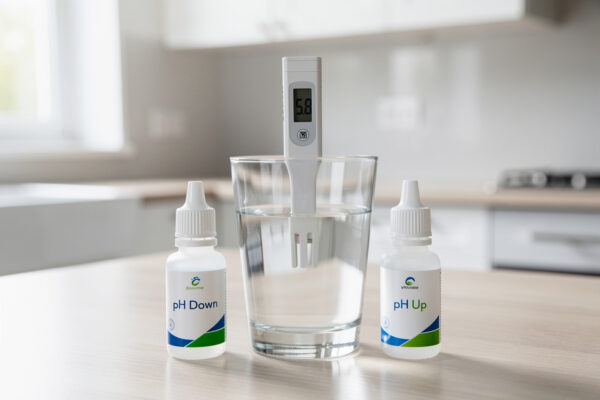
This is the most critical equipment purchase you will make. pH determines whether plants can absorb the nutrients you provide. Outside the 5.5-6.5 range, plants starve even when surrounded by fertilizer.
Buy a digital pH meter for $15-25. It provides accurate readings instantly. Also purchase pH Up and pH Down solutions for adjustments. Test your water before adding nutrients, after adding nutrients, and every few days during growing.
Most municipal tap water runs slightly alkaline. With nutrients added, pH typically lands around 6.5-7.5—too high for optimal plant growth. Add pH Down a few drops at a time, mixing and retesting until you reach 5.8-6.2.
5. Air Pump and Air Stone (For DWC)
If using Deep Water Culture, an air pump is essential. A simple aquarium pump rated for 10-20 gallons costs $10-15. Connect it to an air stone dropped in your reservoir. Run it 24 hours daily.
The bubbling serves two purposes: it dissolves oxygen into the water for roots to breathe, and it circulates nutrients to prevent stagnant zones. Without aeration, roots suffocate and rot within days.
Step-by-Step: Your First Hydroponic Grow
Follow these exact steps for your first successful harvest. Do not skip steps or improvise until you understand the fundamentals.
Step 1: Prepare Your Container
Paint your bucket black or wrap it completely in black tape or fabric. Drill a hole in the lid to fit your net pot—it should rest securely without falling through. If using DWC, drill a small hole near the lid edge for the air line.
Rinse clay pebbles thoroughly to remove dust. Dust clouds the water and can clog pumps.
Step 2: Mix Nutrient Solution
Fill your bucket with water to 2 inches below where the net pot bottom will sit. Add nutrients following package directions—typically 1-2 teaspoons per gallon for seedlings. Stir thoroughly.
Test pH. Adjust to 5.8-6.2 using pH Down (most likely) or pH Up (rarely). Add adjustment solutions a few drops at a time, mixing and retesting. Small adjustments prevent overshooting your target.
Step 3: Install Air System (DWC Only)
Connect air tubing from your pump to the air stone. Place the stone in the bucket bottom. Run the tubing out through the lid hole. Turn on the pump—you should see vigorous bubbling.
Position the pump above water level if possible, or use a check valve, to prevent water siphoning back if power fails.
Step 4: Plant Your Seedling
Start with seedlings, not seeds. Seeds require precise moisture control difficult to achieve in hydroponic systems. Germinate in rockwool cubes or small pots, then transplant. For a complete walkthrough of starting seeds indoors before transplanting, CityRooted has a complete guide to growing plants from seed indoors that covers tray setup, timing, light requirements, and the transplant process.
Place your seedling in the net pot. Spread roots downward so they will grow into the solution. Fill around the plant with clay pebbles to anchor it. The pebbles should touch or nearly touch the water—wicking keeps them moist until roots reach the solution.
Install the lid with net pot onto your bucket. The bottom of the net pot should hang just above the water surface.
Step 5: Position and Monitor
Place your system where plants receive adequate light—either a sunny window with 6+ hours direct sun or under LED grow lights for 14-16 hours daily.
Check daily that the air pump runs and bubbles vigorously. Test pH every 2-3 days and adjust as needed. Top off water weekly with pH-adjusted plain water as plants drink.
Watch your plants closely. Healthy plants grow visibly day by day. Yellowing, browning, or wilting signals problems you must address promptly.
Best First Plants for Guaranteed Success
Plant choice determines your success more than any equipment decision. Some plants tolerate mistakes and varying conditions. Others demand precision and punish errors. As a beginner, choose forgiving plants.
Lettuce: The Perfect Starter Crop
Lettuce is the undisputed best plant for hydroponic beginners. It germinates quickly, grows fast, tolerates pH fluctuations, thrives in moderate light, and produces harvestable heads in 30-45 days.
Butterhead and looseleaf varieties are most forgiving. Romaine grows slightly slower but offers satisfying crunch. Start with one variety, then experiment once you succeed.
Plant new lettuce every two weeks for continuous harvests. By the time you finish one batch, the next is ready.
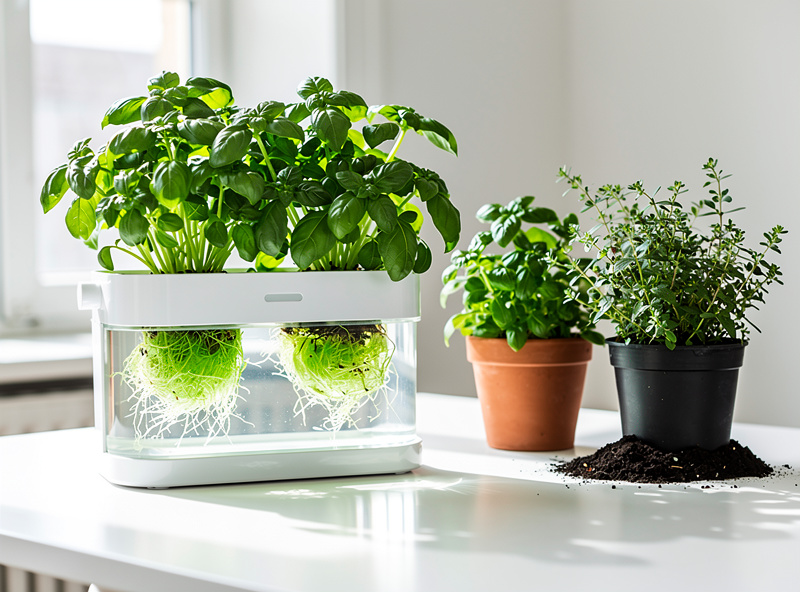
Basil: Fast and Aromatic
Basil grows faster in hydroponics than in soil—noticeably faster. It loves consistent moisture and produces abundant harvests from a single plant. Pinch growing tips to encourage bushy growth and prevent flowering.
Genovese basil offers classic Italian flavor. Thai basil adds spiciness with purple accents. Both thrive in simple DWC systems and provide harvests for months.
Herbs: High Value, Small Space
Fresh herbs from the grocery store are expensive and often wilted. Homegrown hydroponic herbs cost pennies per harvest and taste dramatically better.
Mint is nearly impossible to kill and grows aggressively. Cilantro offers quick harvests but bolts in heat—keep temperatures moderate. Parsley takes longer to germinate but produces for months. Chives require almost no attention once established.
A single DWC bucket with four 2-inch net pots can supply all the herbs a household uses regularly.
Save These for Later
Tomatoes, peppers, and cucumbers produce rewarding harvests but require more light, space, and attention than leafy greens. Master lettuce and herbs first. After two or three successful grows, expand to fruiting plants with confidence.
Root vegetables like carrots and potatoes are poorly suited to basic hydroponic systems. They need deep growing media and produce crops cheaply available at any market. Focus above-ground crops instead.
Common Beginner Mistakes (And How to Avoid Them)
Every beginner makes mistakes. The difference between frustrated failure and successful learning is knowing what to watch for.
Mistake 1: Ignoring pH
This kills more hydroponic plants than all other mistakes combined. At wrong pH levels, nutrients become chemically locked—present in the water but unavailable for absorption. Plants show deficiency symptoms even when surrounded by fertilizer.
Solution: Test pH every 2-3 days without exception. Keep it between 5.5-6.5. When problems appear, check pH first before adding nutrients or making other changes.
Mistake 2: Overfeeding
More nutrients do not mean faster growth. Excess concentration burns roots and leaves, stunting plants you hoped to accelerate. Bottle directions show maximum concentrations—start at half strength and increase only if plants show hunger signs.
Solution: Begin with 50% of recommended nutrient strength. Watch for pale leaves or slowed growth as signs plants want more. Brown, crispy leaf tips signal overfeeding—dilute immediately.
Mistake 3: Insufficient Light
Plants need energy to grow. Without adequate light, even perfect nutrition cannot drive growth. Indoor growers often underestimate light requirements, especially for fruiting plants.
Solution: Leafy greens need moderate light—10-14 hours daily from a sunny window or basic LED panel. Fruiting plants need intense light—14-18 hours from powerful LEDs. Match your lighting to your crops.
Mistake 4: Poor Water Temperature
Roots prefer 65-72°F water. Warm water holds less oxygen and encourages pathogen growth. Cold water slows metabolism. Both extremes stress plants.
Solution: Monitor reservoir temperature with a cheap aquarium thermometer. If water exceeds 72°F, use frozen water bottles to cool it or move the system to a cooler location. In hot climates, consider insulation or chillers for long-term growing.
Mistake 5: Starting Too Big
Enthusiasm leads beginners to build elaborate multi-plant systems before understanding basics. When problems arise—and they will—overwhelmed growers abandon the entire garden.
Solution: Start with one bucket and 2-3 lettuce plants. Learn on a small scale where mistakes cost little. Expand only after successful harvests build your confidence and knowledge.
Maintenance Schedule for Success
Hydroponics requires less daily work than soil gardening but needs consistent attention. Build these habits from day one.
Daily (2 minutes):
- Verify air pump runs and bubbles vigorously
- Visual check for obvious plant problems
- Ensure water level covers roots adequately
Every 2-3 days (5 minutes):
- Test and adjust pH
- Check water temperature
- Inspect leaf color and root health
Weekly (15 minutes):
- Top off water level with pH-adjusted plain water
- Clean any algae or debris
- Assess overall plant growth and health
Monthly (30 minutes):
- Full reservoir change with fresh nutrients
- Clean air stones if flow decreases
- Calibrate pH meter
This minimal time investment prevents the catastrophic failures that cost hours to fix—or kill plants entirely.
When Things Go Wrong: Troubleshooting Guide
Problems appear in every garden. Quick diagnosis and response saves plants. Use this reference when symptoms develop.
| Symptom | Most Likely Cause | Immediate Action |
|---|---|---|
| Yellow leaves | pH problems or nitrogen deficiency | Check and adjust pH first |
| Brown leaf tips | Nutrient burn | Dilute solution to half strength |
| Wilting despite wet roots | Root rot or oxygen deprivation | Check roots, increase aeration |
| Brown/slimy roots | Root rot from low oxygen or heat | Change water, cool reservoir, add hydrogen peroxide |
| Stretched, leggy growth | Insufficient light | Add more light or move closer |
| Slow growth | Multiple possible causes | Check pH, then nutrients, then temperature |
| Algae in reservoir | Light entering container | Block all light immediately |
| Foul smell from system | Anaerobic bacteria or dead roots | Full system clean, improve oxygenation |
Expanding Your Hydroponic Garden
After your first successful harvest, you will understand the fundamentals. Now you can expand strategically.
Scaling Up Production
Add more identical systems rather than building complex multi-plant setups. Four separate DWC buckets offer redundancy—if one fails, three continue producing. They also let you grow different plants with different nutrient needs.
Consider NFT channels for lettuce production if you eat salads regularly. The continuous flow design suits leafy greens perfectly and produces clean, professional-quality crops.
Trying New Plants
With experience, expand beyond leafy greens:
Cherry tomatoes are the best first fruiting plant. They produce quickly, tolerate some mistakes, and taste infinitely better than store-bought. They need strong light and support structures as they grow tall.
Peppers follow similar care to tomatoes. Start with compact sweet varieties before attempting large bell peppers or hot peppers.
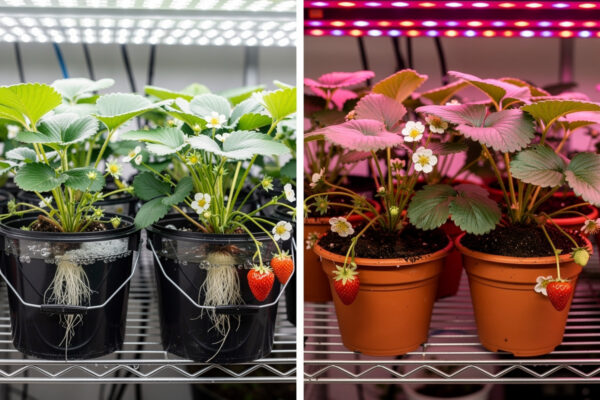
Strawberries grow wonderfully in vertical NFT towers. They require patience through establishment but produce for years.
Automation Possibilities
As you grow, you may add conveniences: timers for lights, pumps on intervals, pH dosers, environmental monitors. But master manual operation first. Understanding your system’s behavior makes you a better grower than automation alone ever will.
Your Next Steps
You now have complete knowledge to start growing hydroponically. Action separates successful growers from eternal researchers.
- Choose your first system — We recommend starting with a simple DWC bucket. See our hydroponic systems guide for detailed comparisons.
- Buy essential equipment — Follow our equipment guide for exactly what to purchase and where to find it affordably.
- Select easy plants — Start with lettuce or herbs. Our plant guide lists the 15 best beginner options.
- Avoid mistakes — Study our mistakes guide to prevent the problems that frustrate most beginners.
- Build on a budget — Our DIY systems guide shows three systems you can build for under $50 each.
Hydroponics transforms how you think about growing food. No seasons to wait for. No weather to battle. No weeding in the hot sun. Just fresh, healthy plants growing faster than you thought possible.
Your first harvest is closer than you imagine. Gather your equipment, mix your nutrients, plant your first seedling, and join thousands of home growers who have discovered the satisfaction of hydroponic gardening.
Start today. Grow tomorrow. Harvest soon.
Is hydroponics better than soil?
Hydroponics produces 30-50% faster growth and uses 90% less water than soil gardening. Plants grow faster because nutrients are delivered directly to roots, eliminating the energy plants spend searching for food in soil. However, soil is more forgiving for beginners and requires no electricity.
Can a beginner grow hydroponics?
Yes. Start with a simple Deep Water Culture (DWC) system using a 5-gallon bucket, air pump, and clay pebbles. Grow lettuce or basil first — both tolerate beginner mistakes and produce harvestable crops in 30-45 days. Total startup cost is under $30.
How much does it cost to start hydroponics?
A basic DWC setup costs $25-40: $5 bucket, $10 air pump and stone, $10 clay pebbles, $5 net pot, and $5-10 for nutrients. Pre-made hydroponic kits range from $50-150. Budget $100-200 for a quality LED grow light for indoor growing.
What is the easiest plant to grow hydroponically?
Lettuce is the easiest hydroponic plant. It germinates quickly, tolerates pH fluctuations, grows in 30-45 days, and thrives in moderate light. Basil, mint, and cilantro are also excellent beginner choices that produce harvests for months from a single plant.
How often do you change water in hydroponics?
Completely replace the nutrient reservoir every 7-14 days. Top off daily with pH-balanced plain water as plants transpire. Test pH every 2-3 days and adjust to the 5.5-6.5 range. Full changes prevent nutrient imbalances and salt buildup.
Does hydroponics need sunlight?
No, hydroponics does not need natural sunlight. LED grow lights provide all the light plants need. Leafy greens require 10-14 hours of light daily, while fruiting plants like tomatoes need 14-18 hours. A 25-40 watt LED panel per square foot is sufficient for greens.
Related Articles
- Hydroponics for Beginners: Ultimate Guide — Complete getting started guide with step-by-step setup instructions
- Hydroponic Systems Explained: DWC, NFT, Ebb and Flow
- Essential Hydroponic Equipment: What You Actually Need
- Best Plants for Hydroponic Growing: 15 Easy Options
- 7 Common Hydroponic Mistakes That Kill Plants
- DIY Hydroponics on a Budget: 3 Systems Under $50