Selecting the wrong hydroponic system is the number one reason beginners abandon soilless growing. In my own res logs and in the beginners I’ve talked through their first build, Deep Water Culture is the system people actually stick with past the first month — not because it’s foolproof, but because its mistakes are slow and forgiving. The systems I’ve watched people quit fastest are the ones with the steepest learning curve, like aeroponics, not because the plants fail but because the grower runs out of patience before the troubleshooting instincts kick in. With eight major hydroponic system types—each with distinct advantages, costs, and learning curves—understanding which method matches your skill level, budget, and growing goals determines whether you enjoy hydroponics or abandon it within weeks. This complete guide breaks down every major hydroponic system, from the simplest passive Kratky setup to commercial-grade NFT channels, with specific recommendations for each stage of your growing journey.
Whichever system you choose, the nutrient solution running through it determines plant health more than any other factor. The complete guide to hydroponic nutrients covers the EC, pH, and feeding schedules that apply across every system type below. For the bottle-level chemistry of the most widely used 3-part feed, our deep-dive on FloraGro, FloraMicro, and FloraBloom explains why three bottles is the minimum for full-control hydroponic nutrition.
Why System Selection Matters
The hydroponic system you choose shapes every aspect of your growing experience—from daily maintenance requirements to which plants you can successfully cultivate. Each system type represents a different balance of simplicity, capability, and cost. Matching these characteristics to your specific situation prevents the frustration that drives many beginners to quit.
Beginners often select systems based on impressive YouTube harvests without considering the technical complexity behind those results. A commercial NFT operation producing pristine lettuce heads requires precise flow rate management, pH monitoring, and electrical backup systems. Attempting that complexity as your first grow invites failure.
Conversely, experienced growers sometimes outgrow simple systems and limit their potential by not upgrading. The Kratky method that successfully grew your first lettuce cannot scale to year-round tomato production. Understanding when to use each system—and when to transition between them—maximizes your growing success at every stage.
For plant-specific system recommendations, see the complete guide to hydroponic plant growing, which matches crops to their ideal growing methods.
Hydroponic Systems at a Glance
Before diving into detailed explanations, this comparison table summarizes the eight major hydroponic system types across the factors that matter most for system selection:
| System | Difficulty | Setup Cost | Best For | Power Required | Maintenance |
|---|---|---|---|---|---|
| Kratky (Passive) | Very Easy | $15-25 | Lettuce, herbs, beginners | No | Minimal |
| Deep Water Culture | Easy | $40-60 | All plants, learning fundamentals | Air pump | Weekly |
| NFT (Nutrient Film) | Moderate | $80-150 | Leafy greens, herbs, scaling | Water pump | Daily |
| Ebb and Flow | Moderate | $60-100 | Medium plants, reliability | Water pump | Weekly |
| Dutch Bucket | Moderate-Hard | $100-200 | Large fruiting plants | Water pump | Weekly |
| Aeroponics | Hard | $200-500 | Maximum growth speed | Multiple pumps | Daily |
| Drip System | Moderate | $60-120 | Large plants, commercial | Water pump | Medium-High |
| Wick System | Very Easy | $10-20 | Small herbs, learning | No | Very Low |
Your first system should almost always be either Kratky or Deep Water Culture. These forgiving methods teach hydroponic fundamentals without the complexity that overwhelms beginners. Only after mastering these basics should you consider more advanced systems.
System 1: Kratky Method (Passive Hydroponics)
The Kratky method is the absolute entry point into hydroponics—a passive system requiring no electricity, no pumps, and no moving parts. Named after Dr. Bernard Kratky, who developed and published the technique through the University of Hawaii’s College of Tropical Agriculture (CTAHR VC-1), this method proves that hydroponics can be remarkably simple. It’s the one I keep running as my zero-pump control method — no variables to second-guess when I’m teaching someone the fundamentals of EC and pH before anything else gets added to the mix.
How Kratky Works
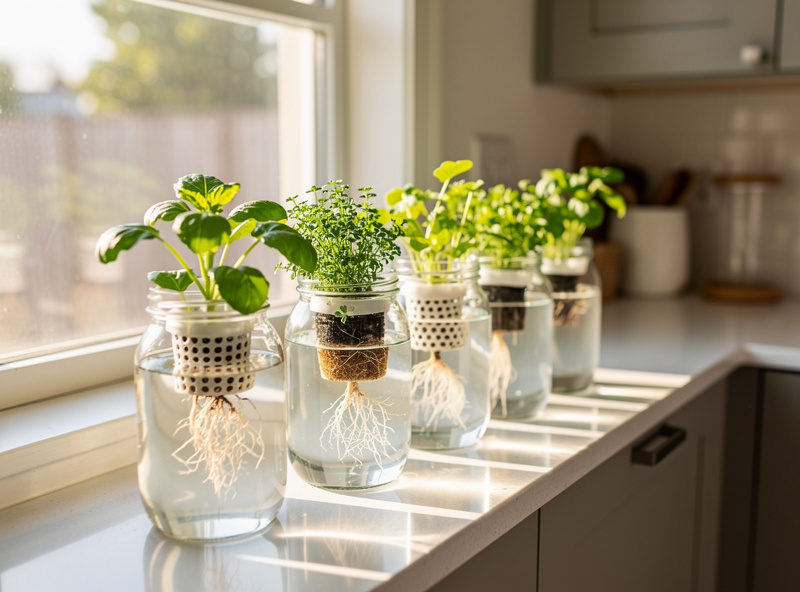
A plant sits in a net pot suspended over a container of nutrient solution. As the plant drinks, the water level drops, automatically exposing the upper roots to air while lower roots remain in the nutrient solution. This creates a natural air gap that eliminates the need for aeration equipment.
The genius of Kratky lies in its simplicity. Roots adapt to the changing water level, developing both submerged roots for nutrient uptake and aerial roots for oxygen absorption. This dual root system maintains plant health without any mechanical intervention.
Kratky Advantages
Zero ongoing costs: No electricity means no power bills, no pump replacements, and no electrical failures killing your plants during outages. This makes Kratky ideal for off-grid situations or areas with unreliable power.
Silent operation: Without pumps or air stones, Kratky systems make no noise. This matters for bedrooms, offices, or anywhere you do not want constant bubbling sounds.
Minimal maintenance: Fill the container once and let the plant grow until harvest. No pH monitoring, no nutrient adjustments, no weekly reservoir changes. Check water levels every few days and refill if needed—though many setups run the full grow cycle without intervention.
Ultra-low cost: A complete Kratky setup costs $15-25. Mason jars, food containers, or buckets work as reservoirs. Net pots and clay pebbles are the only specialized purchases required.
Kratky Limitations
Limited plant size: Small reservoirs restrict how large plants can grow. Lettuce and herbs thrive, but tomatoes and peppers eventually exhaust the nutrient supply or become root-bound. Typical Kratky runs last 4-6 weeks before plants need transplanting or harvest.
No recirculation: Once the initial nutrient solution depletes, the system requires complete restart. You cannot simply top off with fresh nutrients as the balance changes over time.
Environmental sensitivity: Without active aeration, Kratky systems are more sensitive to warm temperatures. I keep every reservoir at or below 68°F (20°C); once it climbs past 72°F (22°C), dissolved oxygen craters and root rot risk spikes fast. This limits Kratky to cooler growing environments or requires insulation in warm climates.
For complete Kratky setup instructions, see the DIY hydroponics on a budget guide, which provides step-by-step builds for under $20, or the dedicated Kratky method guide for the full technique breakdown and best crops.
System 2: Deep Water Culture (DWC)
Deep Water Culture represents the sweet spot for beginner hydroponics—simple enough for first-time growers while capable enough for serious production. This system suspends plant roots directly in a nutrient solution with continuous air bubbling through the water. It’s the daily workhorse on my own bench — the baseline I measure every other method against. My full breakdown of setup, bucket sizing, and troubleshooting lives in the DWC hydroponics guide.
How DWC Works
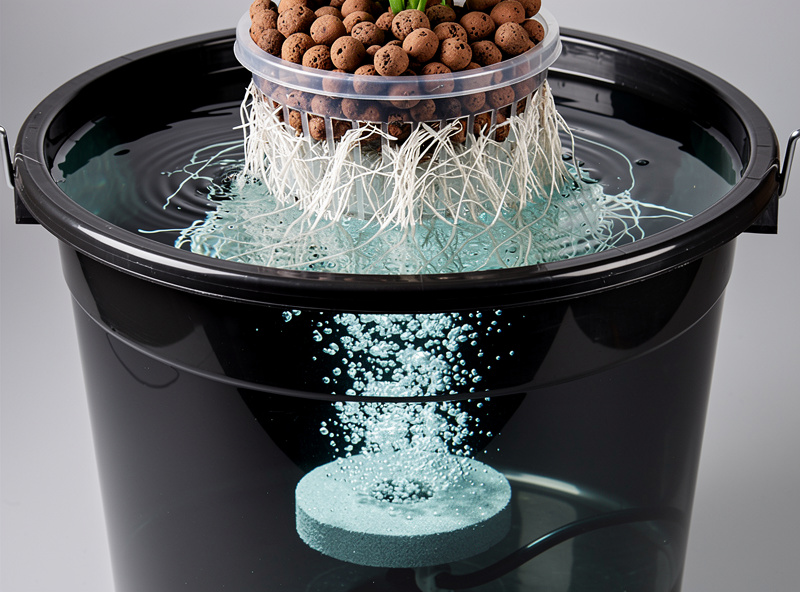
A plant in a net pot sits suspended over a reservoir—typically a 5-gallon bucket—filled with nutrient solution. An air pump connected to an air stone bubbles oxygen continuously through the water, keeping roots healthy and preventing the suffocation that occurs in stagnant water.
The constant oxygen supply allows roots to absorb nutrients aggressively, producing the fast growth that makes hydroponics appealing. Unlike Kratky’s passive approach, DWC actively maintains ideal root conditions regardless of plant size or growth stage.
DWC Advantages
Scalable to large plants: The large water volume of DWC reservoirs supports heavy-feeding fruiting plants like tomatoes and peppers. A 5-gallon bucket provides enough nutrient reserve for full-size plants producing for months.
Robust and forgiving: The constant air supply makes DWC more tolerant of temperature fluctuations and pH variations than passive systems. Minor mistakes that would kill Kratky plants often cause only temporary slowdowns in DWC.
Simple maintenance: Weekly pH checks and bi-weekly reservoir changes keep DWC systems running smoothly. For sizing, temperature targets, dissolved oxygen levels, and full maintenance schedules, the hydroponic reservoir guide covers every variable. This regular but manageable maintenance schedule teaches hydroponic fundamentals without overwhelming daily demands.
Proven track record: DWC is the most popular home hydroponic system for good reason—it works reliably across virtually all plant types and grower skill levels.
DWC Limitations
Requires electricity: The air pump must run continuously. Power outages lasting more than a few hours can damage roots. Backup battery air pumps ($15-20) provide insurance against outages.
Pump noise: Air pumps produce a gentle hum that some find soothing and others find annoying. Higher-quality pumps run quieter but cost more.
Water temperature critical: Large reservoirs are harder to cool than small Kratky containers. The same 68°F(20°C)/72°F(22°C) safe-versus-danger split applies here, and it’s a harder line to hold once a 5-gallon bucket sits in a warm room — even with active aeration, temperatures above 72°F cause oxygen depletion. Reservoir chillers ($150-300) solve this for permanent installations.
The hydro indoor garden setup guide provides complete DWC installation instructions, including reservoir sizing and air pump selection.
System 3: Nutrient Film Technique (NFT)
Nutrient Film Technique channels a thin film of nutrient solution over plant roots arranged in sloped pipes or channels. This method dominates commercial lettuce production worldwide—and for good reason. NFT offers unmatched efficiency for suitable crops.
How NFT Works
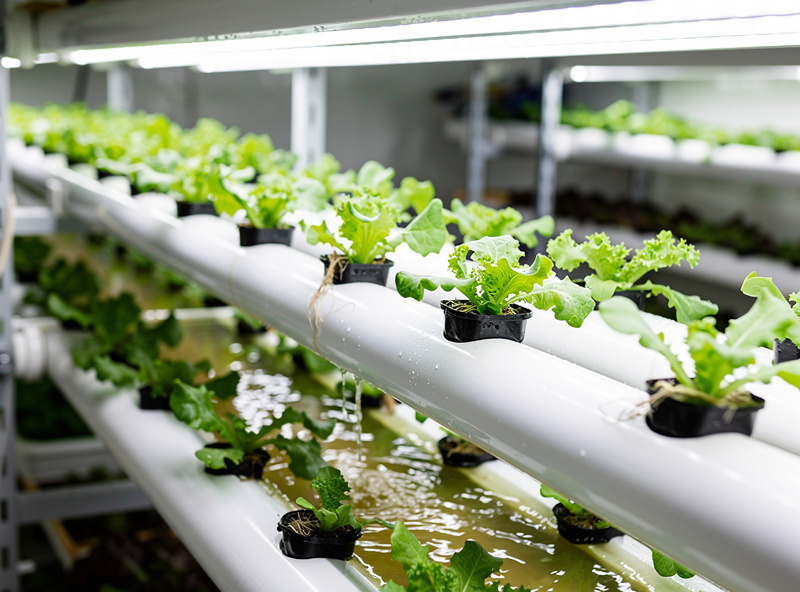
Plants sit in net pots inserted into holes along the top of sloped channels. A thin film of nutrient solution—typically 1-2mm deep—flows continuously through the channel, bathing roots in nutrients and oxygen simultaneously. The slope (usually 1-2 degrees) ensures gravity pulls the solution through while the thin film maximizes oxygen contact.
Solution drains from the channel’s lower end back into a reservoir, where a pump recirculates it back to the channel’s high end. This continuous recirculation means a single reservoir can feed dozens or hundreds of plants.
NFT Advantages
Maximum space efficiency: NFT channels pack plants tightly while maintaining excellent growth rates. A 4-foot channel holds 8-10 lettuce plants in a footprint under one square foot. This density makes NFT ideal for small growing spaces.
Scalable from small to commercial: Add more channels to expand production without redesigning your system. Home growers might run 2-4 channels; commercial operations run thousands.
Clean harvests: Roots never sit in stagnant water, eliminating the root rot issues common in other systems. Harvested produce has no substrate clinging to roots—just clean, ready-to-eat vegetables.
Water efficiency: Recirculating systems use less water than non-recirculating alternatives. The same nutrient solution serves plants for weeks before requiring replacement.
NFT Limitations
Pump-dependent: Power failures are catastrophic in NFT. Without flow, roots dry within hours and plants die. Uninterruptible power supplies or backup generators are essential for serious NFT operations.
Not for large plants: The shallow channels cannot accommodate the root systems of tomatoes, peppers, or other large plants. NFT is strictly for leafy greens and herbs.
Requires precise setup: Channel slope, flow rate, and channel length must be correctly balanced. Too steep and solution rushes through; too shallow and roots sit in stagnant water. This learning curve frustrates some beginners.
Daily monitoring: Check flow rates and inspect roots daily. Small problems escalate quickly in NFT’s thin film environment.
For plant-specific guidance on NFT-compatible crops, see the hydroponic plant growing guide. For channel slope, flow rate, and root mat prevention, the dedicated NFT hydroponic system guide covers the full build.
System 4: Ebb and Flow (Flood and Drain)
Ebb and Flow systems periodically flood a plant tray with nutrient solution, then drain it back to a reservoir. This flooding cycle mimics natural wet-dry patterns that many plants evolved to expect, promoting robust root development.
How Ebb and Flow Works
Plants sit in a flood table or individual pots arranged in the tray. A timer-controlled pump periodically floods the tray with nutrient solution from a reservoir below. After several minutes, the pump shuts off and solution drains back through the same pump or a separate overflow drain.
This wet-dry cycle provides roots with both nutrient-rich water and oxygen-rich air. When flooded, roots absorb nutrients; when drained, roots breathe. Many plants respond with especially vigorous growth to this alternating exposure. This is the system I move fruiting crops onto once they set — a clay-pebble bed on a timed cycle handles the heavier feeding without the daily fuss NFT demands.
Ebb and Flow Advantages
Flexible growing media: Unlike pure water systems, Ebb and Flow supports plants in clay pebbles, coco coir, rockwool, or even soilless potting mixes. This flexibility accommodates plants that prefer substrate support.
Power outage tolerance: If power fails, plants simply remain in their growing media without immediate damage. This tolerance exceeds NFT’s vulnerability and provides peace of mind.
Good for medium plants: While not supporting massive root systems like DWC, Ebb and Flow handles plants larger than NFT accommodates. Peppers, bush tomatoes, and compact cucumbers thrive in properly sized Ebb and Flow setups.
Ebb and Flow Limitations
Heavier than other systems: Flood tables filled with growing media and water weigh significantly more than NFT channels. Sturdy support structures are essential.
Timer management: Incorrect flooding schedules cause problems. Too frequent and roots suffocate; too infrequent and plants dry out. Finding the right balance requires experimentation.
Cleaning between cycles: Debris accumulates in flood tables and requires regular cleaning. This maintenance exceeds the simple reservoir changes of DWC.
For timer intervals, tray sizing, and the root rot mistakes that trip up first-time flood-and-drain builders, see the dedicated ebb and flow hydroponics guide.
System 5: Dutch Bucket (Bato Bucket)
Dutch bucket systems scale Deep Water Culture principles for commercial fruiting plant production. Each plant gets its own bucket with individual irrigation and drainage, connected to a shared reservoir. I haven’t run a Dutch bucket build on my own bench — everything below reflects how the design works and what growers running it commercially report, not my own res logs, so treat it as the one system in this guide I’m describing rather than vouching for firsthand.
How Dutch Bucket Works
Each plant grows in a bucket—typically 2-5 gallons—filled with growing medium like coco coir or perlite. A drip irrigation line delivers nutrient solution to each bucket, and excess solution drains through the bucket bottom into a return line leading back to the reservoir.
This design supports massive plants like full-size tomatoes, cucumbers, and eggplants. The individual buckets prevent root entanglement while shared reservoirs simplify nutrient management.
Dutch Bucket Advantages
Supports largest plants: Full-size tomato varieties that would overwhelm NFT or standard DWC thrive in Dutch buckets. Commercial hydroponic tomato operations worldwide use this system.
Individual plant control: Remove sick plants without disturbing neighbors. Adjust irrigation for each plant’s needs. This granular control exceeds shared-reservoir systems.
Scalable modular design: Add buckets incrementally as you expand. Start with 4 buckets and grow to 40 using the same reservoir and pump—just add return plumbing.
Dutch Bucket Limitations
Higher complexity: Multiple drip lines, return plumbing, and individual buckets create more failure points than simpler systems. This complexity demands more technical knowledge.
Significant setup cost: Each bucket, drip emitter, and return fitting adds cost. A 10-bucket system runs $150-300 in materials versus $50 for comparable DWC capacity.
Requires plant training: Large hydroponic plants need trellising, pruning, and support structures. This maintenance exceeds simple lettuce growing.
For guidance on growing fruiting plants in Dutch bucket systems, see the hydroponic tomatoes guide and hydroponic peppers guide. For bucket sizing, drip layout, and drain-to-waste versus recirculating setups, the dedicated Dutch bucket hydroponics guide covers the full build.
System 6: Aeroponics
Aeroponics represents the high-performance end of hydroponics—systems that mist plant roots with nutrient solution in an air environment. This method achieves the fastest growth possible but demands precision and constant attention.
How Aeroponics Works
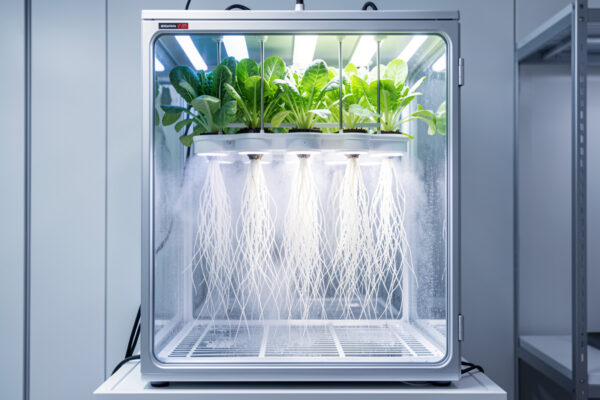
Plants sit in net pots inserted into a sealed chamber. High-pressure misters spray nutrient solution onto exposed roots as a fine fog. Roots hang in air, receiving both nutrients and abundant oxygen simultaneously.
The fine mist maximizes surface contact between roots, nutrients, and oxygen. This ideal environment produces growth rates exceeding any other hydroponic method. I haven’t run aeroponics on my own bench, so I won’t put a number on the edge over NFT — vendor claims all over that range and I can’t verify them myself. The best-documented example I’ve found is NASA’s own Spinoff report on aeroponic tomato propagation, which cut transplant time from 28 days to 10 (NASA Spinoff 2006) — a real, sourced efficiency gain, though it’s a propagation-stage number, not a blanket growth-rate multiplier across every crop and stage.
Aeroponics Advantages
Maximum growth speed: The ideal root environment of aeroponics produces the fastest possible plant growth. For commercial operations where time is money, this speed justifies the complexity.
Extreme water efficiency: Independent water-use-efficiency research comparing aeroponic and ebb-and-flow systems found aeroponics roughly doubled efficiency in controlled trials, and every well-run hydroponic or aeroponic system uses dramatically less water than soil-grown field crops (Grow Space’s breakdown of the real numbers behind hydroponic water usage puts most systems 90%+ below traditional field irrigation). In water-scarce regions, this efficiency is essential.
Minimal growing medium: Plants need only net pots for support, eliminating substrate costs and disposal issues.
Aeroponics Limitations
Unforgiving of mistakes: Without buffer from growing medium or water reservoir, aeroponic plants stress immediately when something goes wrong. A clogged nozzle or pump failure causes visible wilting within an hour.
High technical demands: High-pressure pumps, precise misting schedules, and constant monitoring require expertise. This is not a beginner system.
Expensive setup: Quality high-pressure pumps, pressure tanks, and misting nozzles cost $300-800 for a small system. This investment only makes sense for serious growers or commercial operations.
Nozzle clogging: Minerals in nutrient solution eventually clog fine misting nozzles. Regular cleaning or filtration systems are mandatory maintenance.
When you are ready to attempt aeroponics, the dedicated aeroponics system guide walks through mister sizing, cycle timing, and keeping the nozzles clean.
System 7: Drip Systems
Drip systems are the most common commercial hydroponic setup in the world. They deliver precise amounts of nutrient solution directly to each plant through a network of tubes and emitters. From massive greenhouse operations to backyard hobbyists, drip systems dominate commercial hydroponics for good reason.
How Drip Systems Work
A pump pushes nutrient solution through a main supply line. Smaller tubes branch off to each plant, where drip emitters slowly release the solution directly onto the growing medium. Plants sit in individual containers or a shared grow bed filled with clay pebbles, rockwool, coco coir, or other inert media.
There are two main configurations. Recirculating drip systems collect excess solution that drips through the growing medium in a tray or container and return it to the reservoir for reuse—more water-efficient and economical, and the most common setup for home growers. Non-recirculating drip systems let excess solution drain away without reuse, which wastes nutrients but prevents disease spread through a shared reservoir; commercial operations sometimes prefer this for food safety compliance.
Most drip systems use a timer to control feeding cycles—typically 2-4 times daily for a few minutes each time. Between feedings, the growing medium retains moisture while roots receive oxygen.
Drip System Advantages
Highly customizable: Adjust emitters individually for different plant needs, giving each plant exactly what it requires. Disease isolation is another benefit—one sick plant in its own container does not affect others, unlike shared-reservoir systems.
Proven commercial success and scale: This is what professional greenhouse operations use, and it scales easily from a few plants to hundreds. Drip systems work with virtually any growing medium and handle large, heavy plants better than NFT—Dutch bucket systems (see System 5 above) take this even further for tomatoes and peppers.
Drip System Limitations
Emitter clogging: Mineral buildup or debris clogs emitters over time, requiring regular maintenance—checking emitters and cleaning lines. The setup itself is more complex than DWC, with more components (tubing, fittings, timers, multiple containers) and more potential failure points. Timer failure can stress plants quickly, and initial cost runs higher than a simple DWC bucket.
Best Plants for Drip Systems
Drip systems handle the widest variety of plants, especially larger fruiting crops: tomatoes (indeterminate varieties that vine), peppers of all types, cucumbers, squash and zucchini, strawberries in vertical drip towers, melons, and large woody herbs like rosemary, sage, and oregano.
Drip System Setup Cost
DIY Build: $60-120
Starter Kit: $100-250
Multi-Plant Commercial Setup: $300+
Costs vary significantly based on plant count, container quality, and automation level. A simple recirculating system for 4-6 tomato plants is affordable for most home growers.
System 8: Wick Systems
Wick systems are the most basic form of hydroponics. They require no pumps, no electricity, and virtually no technical knowledge—the passive counterpart to Kratky for growers who want zero moving parts but a continuously replenished reservoir instead of a self-contained jar.
How Wick Systems Work
Plants grow in a container of growing medium positioned above a reservoir of nutrient solution. Fabric or rope wicks connect the reservoir to the growing medium, drawing nutrients up through capillary action.
Wick System Limitations
Slow nutrient delivery limits plant size, and the method only works for small, low-demand plants—it is not suitable for fruiting plants. Best for herbs, small lettuce plants, and educational projects where simplicity matters more than yield.
Choosing Your First Hydroponic System
With six system types explained, the practical question becomes: which should you build first? The answer depends on your goals, budget, and experience level.
| Your Situation | Best System | Setup Cost | Why |
|---|---|---|---|
| Lowest possible cost | Kratky | $15-25 | No equipment needed beyond jar, net pot, and nutrients |
| Learning fundamentals | DWC | $40-60 | Teaches all hydroponic principles with forgiving mistakes |
| Growing fruiting plants | DWC | $40-60 | Only budget system supporting tomatoes and peppers |
| Maximum lettuce production | NFT | $80-150 | Highest density and cleanest harvests for greens |
| Off-grid/no electricity | Kratky | $15-25 | Only system requiring no power |
| Scaling to commercial | NFT or Dutch Bucket | $200+ | Scales efficiently; choose based on crop type |
| Maximum growth speed | Aeroponics | $300-800 | Fastest possible growth for experienced growers |
| Large plants at commercial scale | Drip System | $60-250 | Individual plant control, proven in greenhouse production |
| Absolute lowest cost, no power | Wick System | $10-20 | Capillary action only; best for small herbs |
For 90% of beginners, the choice is simple: start with either Kratky or DWC. These systems teach you how pH, nutrients, and oxygen affect plants—knowledge that transfers to any hydroponic method. Only after succeeding with these basics should you consider upgrading to NFT, Dutch buckets, or aeroponics.
System-Specific Equipment Requirements
Each hydroponic system type requires specific equipment. Understanding these requirements helps you budget accurately and avoid surprise purchases mid-build.
All Systems Require
pH testing and adjustment: Every hydroponic system needs pH management. Digital pH meters ($25-50) are far more accurate than test strips. pH Up and pH Down solutions ($10-15) adjust your water into the 5.5-6.5 range plants need.
Measuring nutrients: Kitchen measuring spoons work for small systems. Graduated cylinders ($5) help with precise mixing. As you scale, consider an EC/TDS meter ($20-40) for measuring nutrient concentration.
Growing medium: Clay pebbles (hydroton) work in virtually all systems. Rockwool cubes are excellent for starting seedlings. Coco coir suits Dutch buckets and Ebb and Flow.
For complete equipment lists by budget level, see the essential hydroponic equipment guide.
System-Specific Equipment
Kratky: Beyond the universal items above, Kratky needs only a suitable container (jar, bucket, or tote) and net pots. No pumps, timers, or electrical equipment required.
DWC: Requires an air pump rated for your reservoir size, air stone, and airline tubing. A $15-20 aquarium pump handles most home setups. Consider a battery backup pump ($20) for power outage protection.
NFT: Needs a water pump rated for your channel length, reservoir, and plumbing fittings. A timer controls pump cycling. pH monitoring becomes critical—daily testing is mandatory.
Ebb and Flow: Requires a submersible water pump, timer, flood table, and drainage fittings. The timer controls flooding cycles—digital timers offer more precision than mechanical ones.
Dutch Bucket: Needs a water pump, drip irrigation lines, drip emitters for each bucket, and return drainage plumbing. Individual emitters let you adjust flow for each plant.
Aeroponics: Demands a high-pressure pump (not standard aquarium pumps), pressure accumulator tank, specialized misting nozzles, and filtration systems. This specialized equipment explains the higher cost.
Drip Systems: Needs a water pump, main supply line, individual drip emitters per plant, and either a catchment tray (recirculating) or drain-to-waste plumbing (non-recirculating). Emitter count scales with plant count.
Wick Systems: Only needs a growing container, a reservoir positioned below it, and fabric or rope wicking material. No pumps, timers, or electrical equipment of any kind.
System Maintenance Schedules
Understanding ongoing maintenance helps you choose a system that fits your available time. Some systems demand daily attention; others run for weeks with minimal intervention.
Kratky Maintenance
Daily: Visual inspection takes 30 seconds—check that plants look healthy and water levels are adequate.
Every 3-5 days: Check water level and refill if needed. pH test optional but recommended weekly.
Between crops: Clean containers and replace growing medium. Sterilize with 3% hydrogen peroxide if disease was present.
Total time investment: 5-10 minutes per week.
DWC Maintenance
Daily: Visual inspection and verify air pump is running. Check for unusual smells (indicating root rot).
Every 3 days: Top off reservoir with pH-balanced water as plants consume it.
Weekly: Test pH and EC, adjust if needed. Inspect roots for color and health.
Every 2 weeks: Complete reservoir change with fresh nutrient solution.
Total time investment: 20-30 minutes per week.
NFT Maintenance
Daily: Check flow rates in all channels, verify pump operation, inspect roots for discoloration, test pH.
Weekly: Complete reservoir change. Clean pump filters. Check for clogged emitters or channel debris.
Between crops: Thorough system sterilization. Replace any worn tubing or fittings.
Total time investment: 45-60 minutes per week.
For troubleshooting when maintenance reveals problems, the common hydroponic mistakes guide covers solutions to the most frequent issues.
Scaling Between Systems
As your skills and ambitions grow, you will likely transition between systems. Understanding when to upgrade prevents frustration and maximizes productivity.
When to Move from Kratky to DWC
Upgrade to DWC when you want to grow fruiting plants (tomatoes, peppers) or when Kratky’s maintenance-free approach starts feeling limiting. DWC’s active aeration supports larger plants and provides more control over growing conditions.
Most growers make this transition within their first 2-3 months of hydroponic growing, after successfully harvesting lettuce in Kratky jars.
When to Move from DWC to NFT
Consider NFT when you want to grow lettuce and herbs at higher density than DWC allows, or when clean harvests become a priority. NFT channels produce pristine lettuce without the substrate particles common in DWC buckets.
This transition typically happens after 3-6 months of successful DWC growing, when you are ready for increased complexity in exchange for professional-quality results.
When to Move from DWC to Dutch Bucket
Switch to Dutch buckets when you want to grow full-size fruiting plants at scale. Cherry tomatoes in DWC satisfy for a while, but full-size varieties demand the larger root zone and individual plant control Dutch buckets provide.
Many growers run both systems simultaneously—NFT for greens and Dutch buckets for fruiting plants—matching each crop to its ideal growing method.
Common System Mistakes
Avoid these errors that plague growers when selecting and operating hydroponic systems:
Starting too complex: Starting with aeroponics or Dutch buckets is the fastest way I’ve watched beginners quit — not because the systems don’t work, but because there’s no margin for error before you’ve built the troubleshooting instincts that come from a season on Kratky or DWC. My own first reservoir was undersized because I didn’t respect how fast a small volume swings on pH and temperature; I learned that lesson before I ever touched a pump-dependent system. Start simple, master fundamentals, then upgrade.
Undersizing reservoirs: Small reservoirs fluctuate faster in pH and temperature, stressing plants. Use the largest reservoir your space allows—stability increases with volume.
Ignoring power backup: NFT and DWC systems die quickly without power. Battery air pumps and UPS units are cheap insurance against crop loss.
Mixing incompatible plants: Leafy greens and fruiting plants need different nutrient strengths. Shared reservoirs force compromise that satisfies neither plant type.
Skipping daily checks: Even low-maintenance systems need daily visual inspection. Small problems caught early prevent catastrophic failures.
Your System Selection Decision
You now understand every major hydroponic system type—how they work, what they excel at, and their limitations. The final decision comes down to matching your specific situation to the right system.
If you are completely new to hydroponics: Start with Kratky. Spend $20 on a mason jar setup, grow your first lettuce, and learn the fundamentals of pH and nutrients without equipment complexity.
If you have basic gardening experience: Begin with DWC. The air pump adds minimal complexity while teaching you the maintenance rhythms of active hydroponic systems. This foundation prepares you for any system upgrade.
If you want to grow fruiting plants: DWC for cherry tomatoes and peppers, or Dutch buckets if you are ready for full-size varieties. These systems support the heavy-feeding plants that produce the most satisfying harvests.
If you want maximum lettuce production: Graduate to NFT after mastering DWC. The space efficiency and clean harvests reward the additional complexity.
Remember: the best system is the one you will actually maintain. A simple Kratky jar that gets checked daily outperforms a complex NFT system that gets ignored.
Choose your system, build it carefully, and start growing. Your first harvest is closer than you think.
What is the easiest hydroponic system for beginners?
The Kratky method is the easiest hydroponic system for beginners. It requires no pumps, no electricity, and no moving parts—just a container with nutrient solution and a plant in a net pot. Deep Water Culture (DWC) is the second easiest, adding an air pump for oxygenation while remaining simple to operate. Both systems let beginners learn hydroponic fundamentals before tackling more complex methods like NFT or Dutch buckets.
What is the best hydroponic system for growing tomatoes?
Dutch bucket (Bato bucket) systems are best for growing full-size tomatoes hydroponically. They provide individual buckets for each plant, support massive root systems, and scale from one plant to commercial operations. For cherry tomatoes and compact varieties, Deep Water Culture (DWC) is simpler and equally effective. Avoid NFT channels for tomatoes—their shallow channels cannot accommodate the large root systems tomato plants develop.
How much does it cost to set up a hydroponic system?
Hydroponic system costs range from $15-25 for simple Kratky setups to $300-800 for advanced aeroponic systems. Deep Water Culture systems cost $40-60, NFT channels cost $80-150, and Dutch buckets cost $100-200. Budget DIY builds using household containers cost a fraction of what pre-made kits run. The DIY hydroponics budget guide shows how to build complete systems for under $50.
Do hydroponic systems need electricity?
Most hydroponic systems need electricity for pumps and lighting. The Kratky method is the exception—it requires no electricity and works passively. Deep Water Culture needs power for air pumps. NFT, Ebb and Flow, Dutch buckets, and aeroponics all require water pumps. For off-grid growing, Kratky is the only practical option. Battery backup systems provide protection against power outages for electric systems.
Which hydroponic system grows plants fastest?
Aeroponic systems have the fastest documented growth of any hydroponic method, though I haven’t run aeroponics myself to verify grower claims firsthand. NASA’s own Spinoff report on aeroponic propagation found transplant time dropped from 28 days to 10 – a real, sourced gain, not a blanket percentage across every crop. However, aeroponics is complex and unforgiving. For home growers, NFT and Deep Water Culture provide excellent growth rates with much simpler operation. The growth speed difference between DWC and NFT is minimal—both significantly outperform soil growing.
Can you build a hydroponic system yourself?
Yes, all hydroponic system types can be built DIY for well under the cost of buying pre-made systems. Kratky systems use mason jars or food containers. DWC uses buckets and aquarium air pumps. NFT uses PVC pipes and water pumps. The DIY hydroponics on a budget guide provides step-by-step instructions for building three complete systems for under $50 each.
What hydroponic system uses the least water?
Aeroponic systems are the most water-efficient hydroponic method – independent water-use research comparing aeroponic to ebb-and-flow systems found aeroponics roughly doubled efficiency in controlled trials. For home growers, the complexity of aeroponics often outweighs the water savings. NFT and recirculating DWC systems both use dramatically less water than soil, with most hydroponic setups running 90%-plus below traditional field irrigation. Kratky, since it doesn’t recirculate, uses more water per plant than the recirculating methods but is still far more efficient than soil growing.
Related Guides
- DIY Hydroponics on a Budget — Build complete systems for under $50
- Hydro Indoor Garden Setup Guide — Complete walkthrough for first-time system builders
- Essential Hydroponic Equipment Guide — What you actually need for successful growing
- Common Hydroponic Mistakes and How to Fix Them — Avoid the pitfalls that kill systems
- Complete Guide to Hydroponic Plant Growing — Match plants to their ideal systems
- Vertical Farming Systems — Scale production in limited space
- Hydroponics vs Soil: Complete Comparison — When hydroponics outperforms traditional growing
- Best Hydroponic Growing Kits — Pre-configured systems for easy startup
- Hydroponics for Beginners — Getting started with your first grow
- Hydroponic Tomatoes vs Soil — Growing fruiting plants successfully